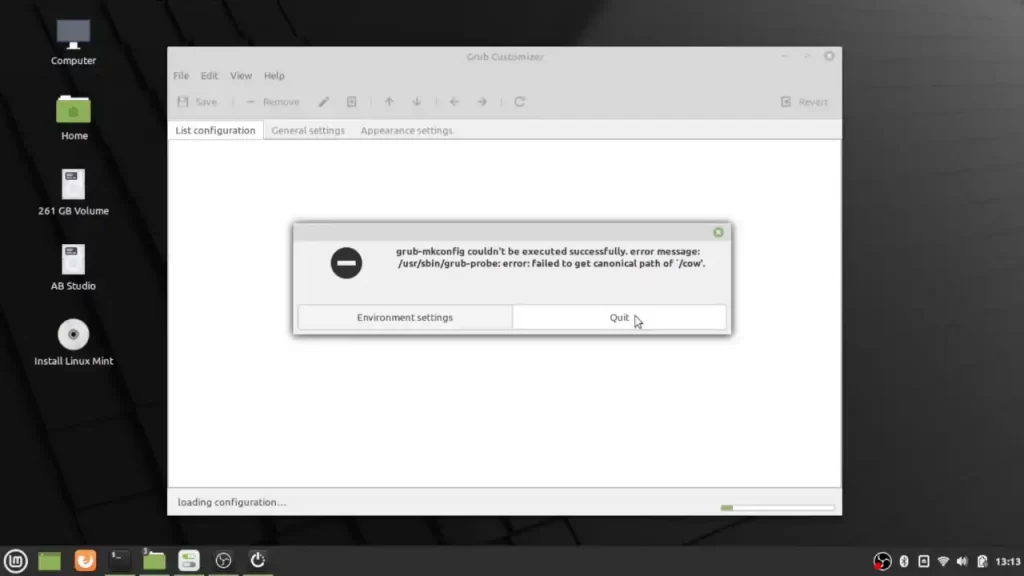
Chrome OS is becoming more popular and the choice of many educational institutions. It is undeniable that many want to try it for themselves. But not everyone is willing to give up the safety and home feel of the Windows Operating System. Let me share a guide to help you with Dual Boot Chrome OS and Windows 10/11.
1. Dual Boot Chrome OS without USB!
There is a new easy method to dual boot Chrome OS available. This does not require any Linux installation or the use of a USB drive. There are a few steps, which are easy to follow. So let’s start the procedure…
System Requirements
- 64 Bit Computer System with 16GB or more space
- Secure Boot Disabled from BIOS
- Hyper-V or Virtualization is enabled from BIOS
- UEFI Boot
- Intel CPU from 8th Gen or above
- Celeron processors are supported as of Goldmont or later.
- AMD Ryzen (No AMD Support)
- ARM CPUs are not supported
Disable Hibernation and Fast Start-Up
- To successfully dual boot Chrome OS and Windows, we must disable hibernation and fast startup. Open the Windows terminal and here type, “
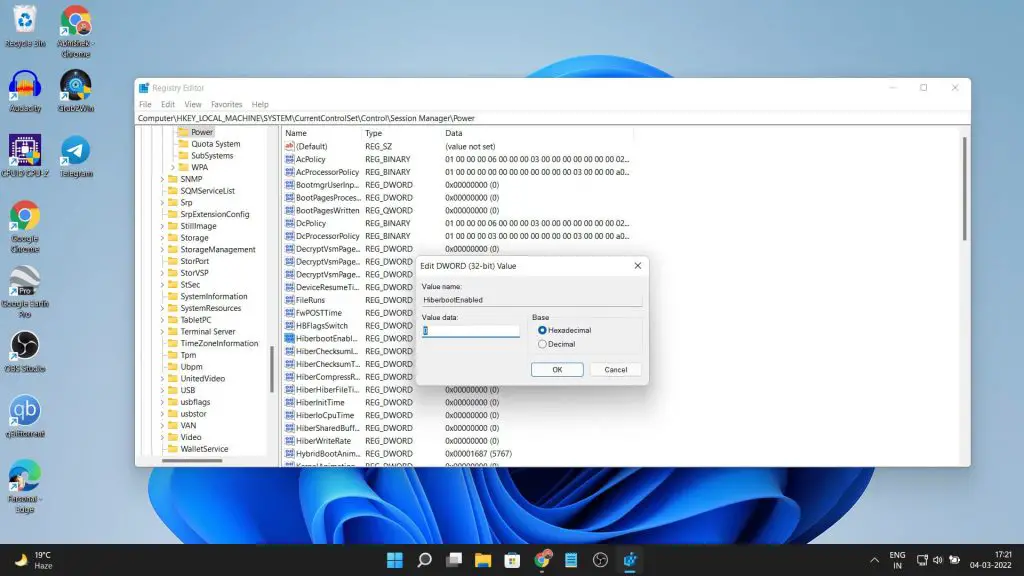
powercfg.exe /hibernate off“. This will disable hibernation mode on our system. - Now to disable fast start-up, we will edit the registry of our Windows computer. Right-click on the Windows key and run “Regedit“. Here follow this path, “
HKEY_LOCAL_MACHINE\SYSTEM\CurrentControlSet\Control\Session Manager\Power“. You can paste this into the path dialogue box. - We need to locate the HyberBootEnabled option, right-click it, and modify it. Change the value from “1” to “0.” This will disable the fast start-up option.
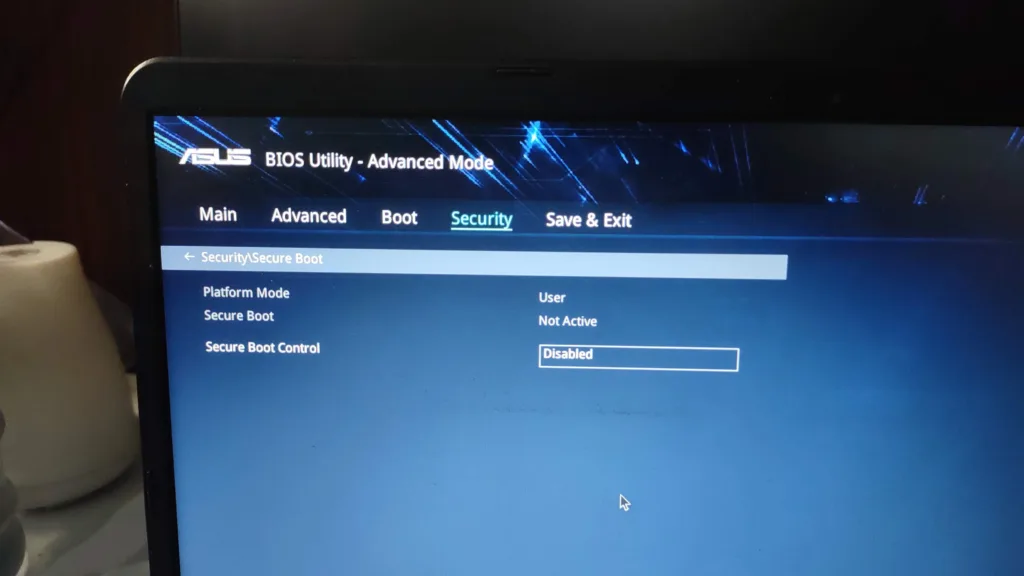
Disable Secure Boot
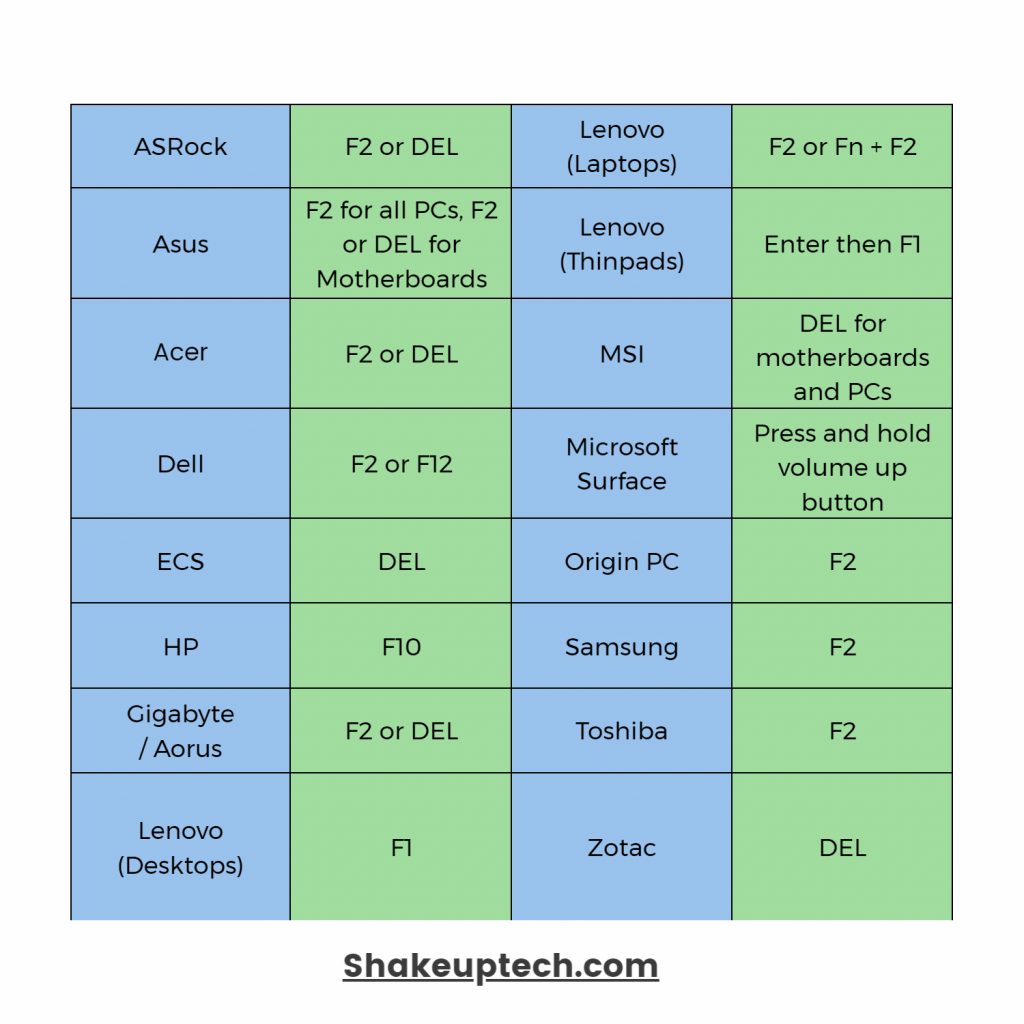
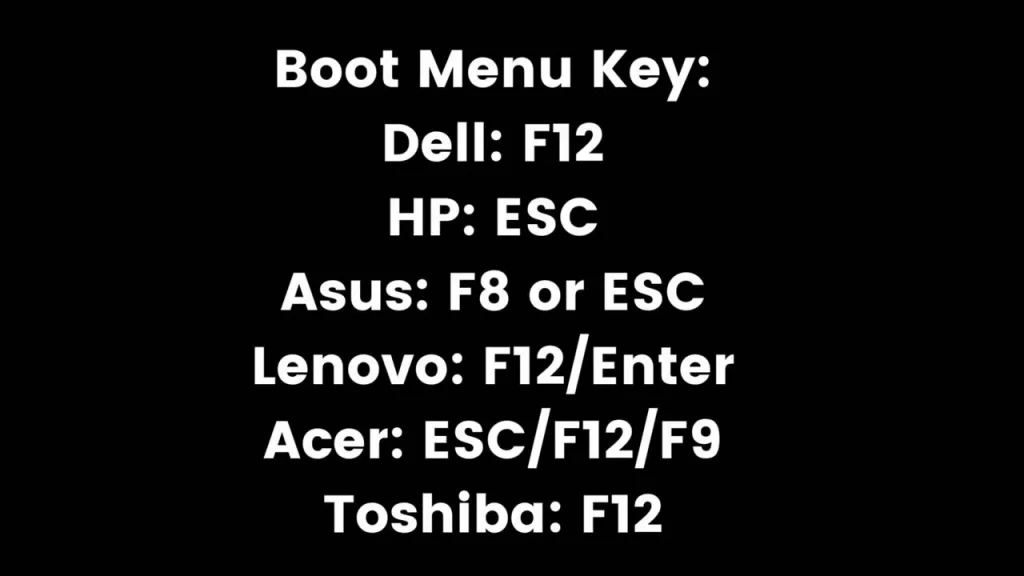
- We need to disable secure boot from our computer’s BIOS. Different manufacturers have different keys to enter the BIOS. The BIOS keys for various companies are below.
- While you are here and if your system is a bit older. Also, find something called the “legacy boot” and disable that as well. Alternatively, if you see the option to switch boot to UEFI, then make sure you do that.
And lastly, we need to enable options related to virtualization. It is called Hyper-V for some and just virtualization for others. On modern computers, it is enabled by default. So, if you don’t see such an option, then it must be enabled already.
Installing WSL / Ubuntu
First, we will set up Ubuntu on our system. Open up PowerShell as admin by right-clicking on the start menu. Here type,
wsl --installAnd the installation of various tools and Ubuntu will begin. After that when you check your installed programs list you’ll see Ubuntu installed as well. Open Ubuntu and create a username and password. Now type,
sudo apt update && sudo apt -y install pv cgpt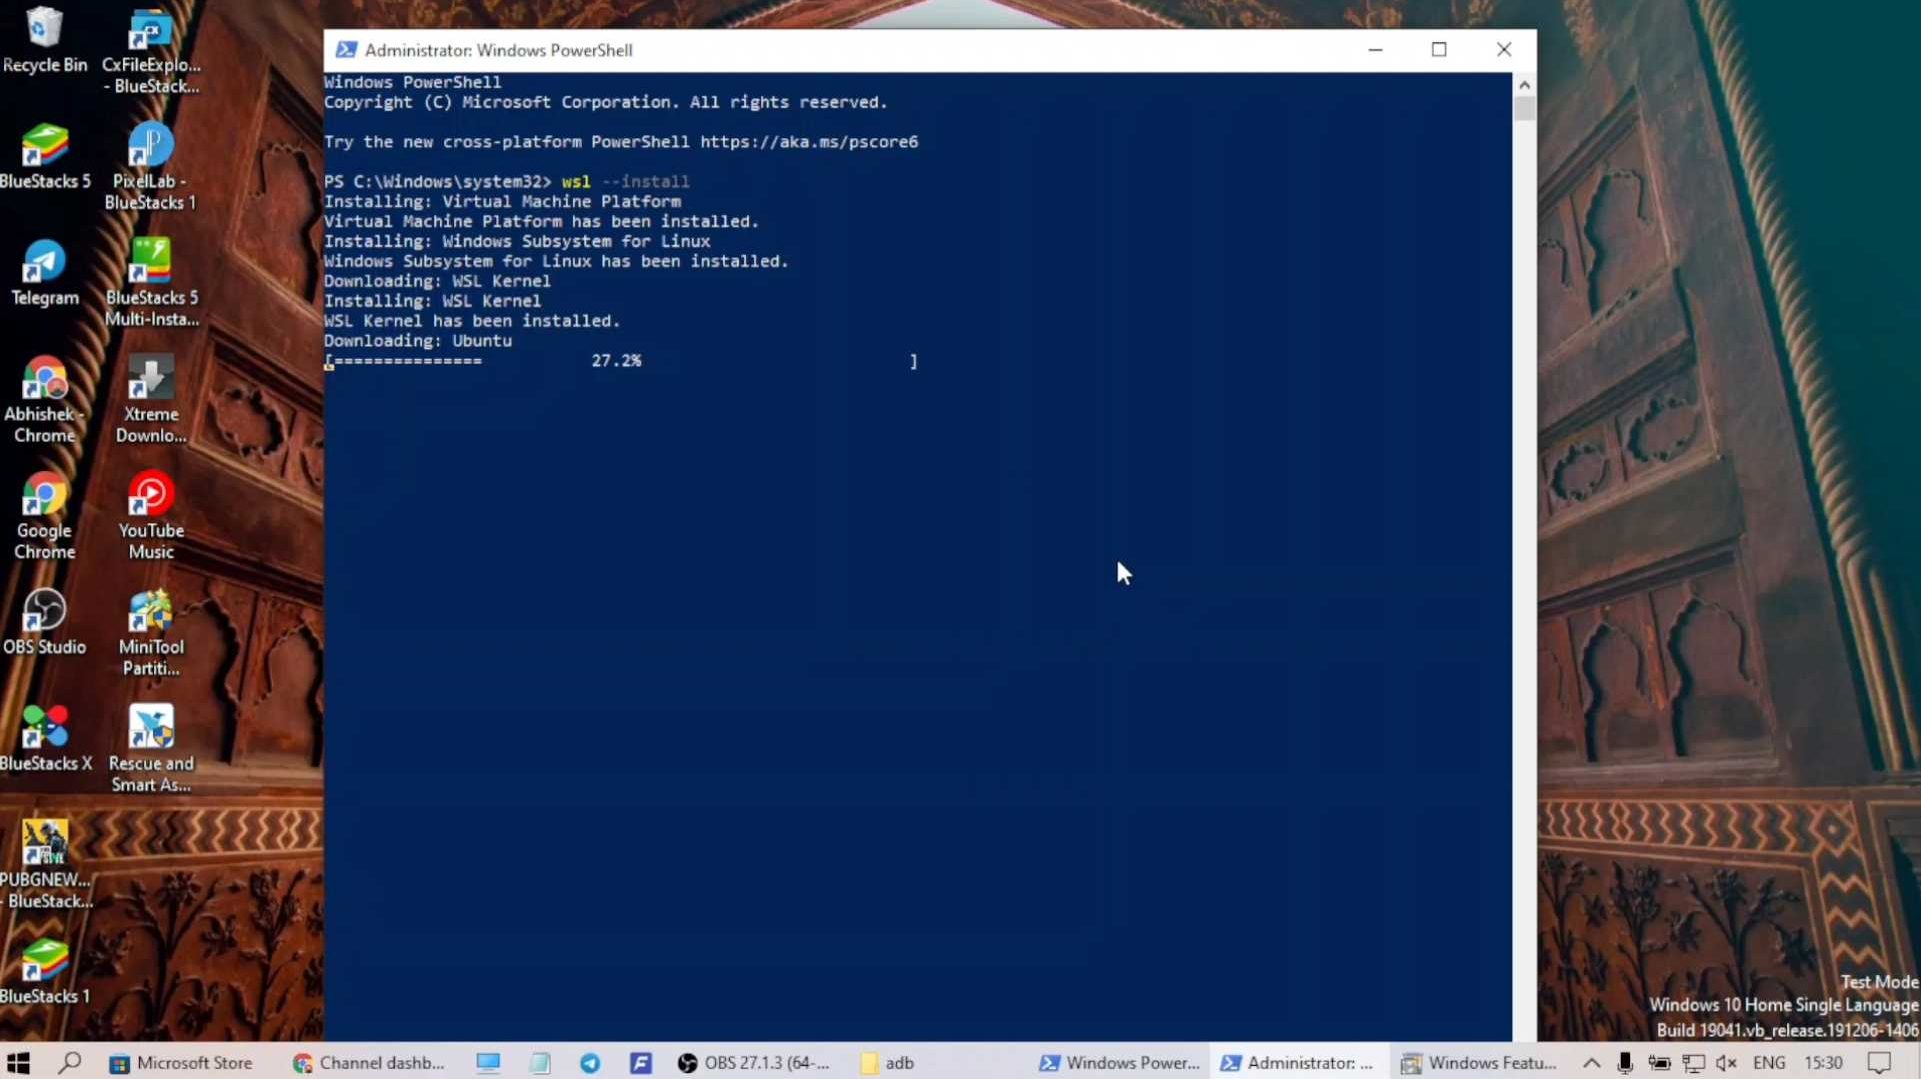
Creating Partitions
- Now in the search dialogue type partition and open “Create and format hard disk”. We will create a new partition to install Chrome OS by right-clicking the D drive and shrinking it.
- You can create a partition of 16GB and above. Name the partition “ChromeOS”. Now open the Chrome OS partition then create a folder and name it “chromeos” without spaces. Also, create a folder named “brunch” inside the partition.
Downloading Files
- First, we will also need the latest Sebanc Brunch file to make all this work. Download the latest version and take note of the version number. Thanks to the developer Sebanc for making this possible.
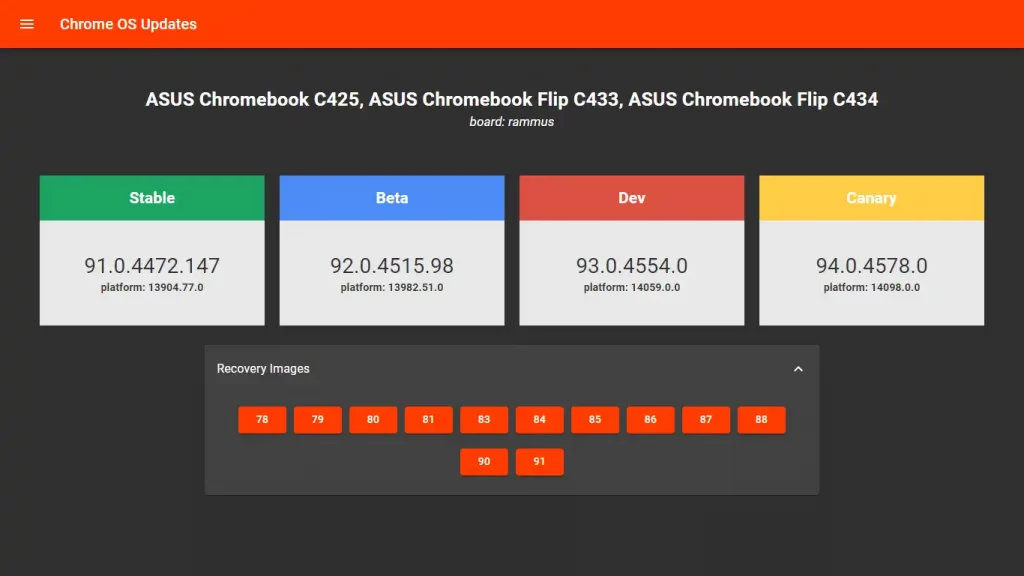
- Moving on, we will download the Chrome OS Recovery image. There are different versions for different CPUs and generations. Download the version similar to that of the Brunch file from the list.
Intel
- 8th gen & 9th gen: “shyvana” for Intel / “bobba” for Celeron.
- 10th gen: “jinlon“.
- 11th gen & above: “voxel“.
AMD
- Ryzen: “gumboz“.
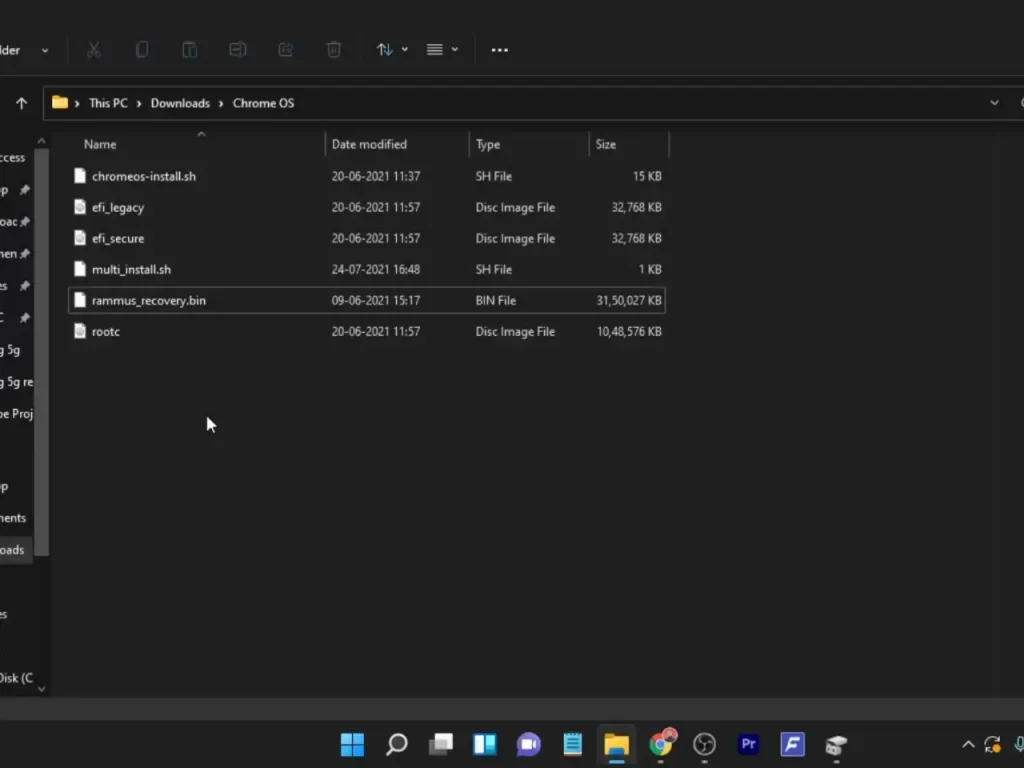
- Now move all the downloaded files into a folder and name it “chromeos“. You can name it anything else but make sure there are no spaces or special characters.
- Lastly, we will download the Grub2Win file from this link. We will use this program to create a dual boot menu. Most of these files are similar to what we have used before.
- For the MBR Boot system, download the MBR patch file from here (not guaranteed to work). Now using 7zip or WinRAR extract all the files. We have to extract the Brunch file twice to get the required files. In the case of MBR only, extract the patch file the same way and it will overwrite existing files in the folder.
Check Out The Video Guide:
Now open Ubuntu and we will mount the directory where all our downloaded files are located. Make sure to double-check the directory path and names. Copy and paste the folder address of the ‘chromeos” folder on a blank document. And then copy and type its content in the below format.
cd /mnt/(your downloads folder location)" for example: cd /mnt/d/downloads/chromeos/- After this, we will type our main installation command. Replace the bracket’s content with the file name that we have extracted. For the Chrome OS Recovery image, make sure to copy the full name including the extension. You can enable the extension in the file explorer from the View > Show extension option.
- Locate your Chrome OS partition see the drive letter and type that in place of the bracket. lastly, put down the size of the partition after -s, probably a little lower than the actual size. Also, do not skip to add the chromeos.img at the end.
sudo bash chromeos-install.sh -src (recovery image name.bin) -dst /mnt/(chromeos partition folder)/brunch/chromeos.img -s (size)

For example: sudo bash chromeos-install.sh -src chromeos_14268.67.0_rammus_recovery_stable-channel_mp-v2.bin -dst /mnt/f/chromeos/brunch/chromeos.img -s 20- Now after making sure everything is correct and okay, hit enter and then let the process begin. Depending upon the size of the partition it can take anywhere from 30 to 60 minutes to complete the processes.
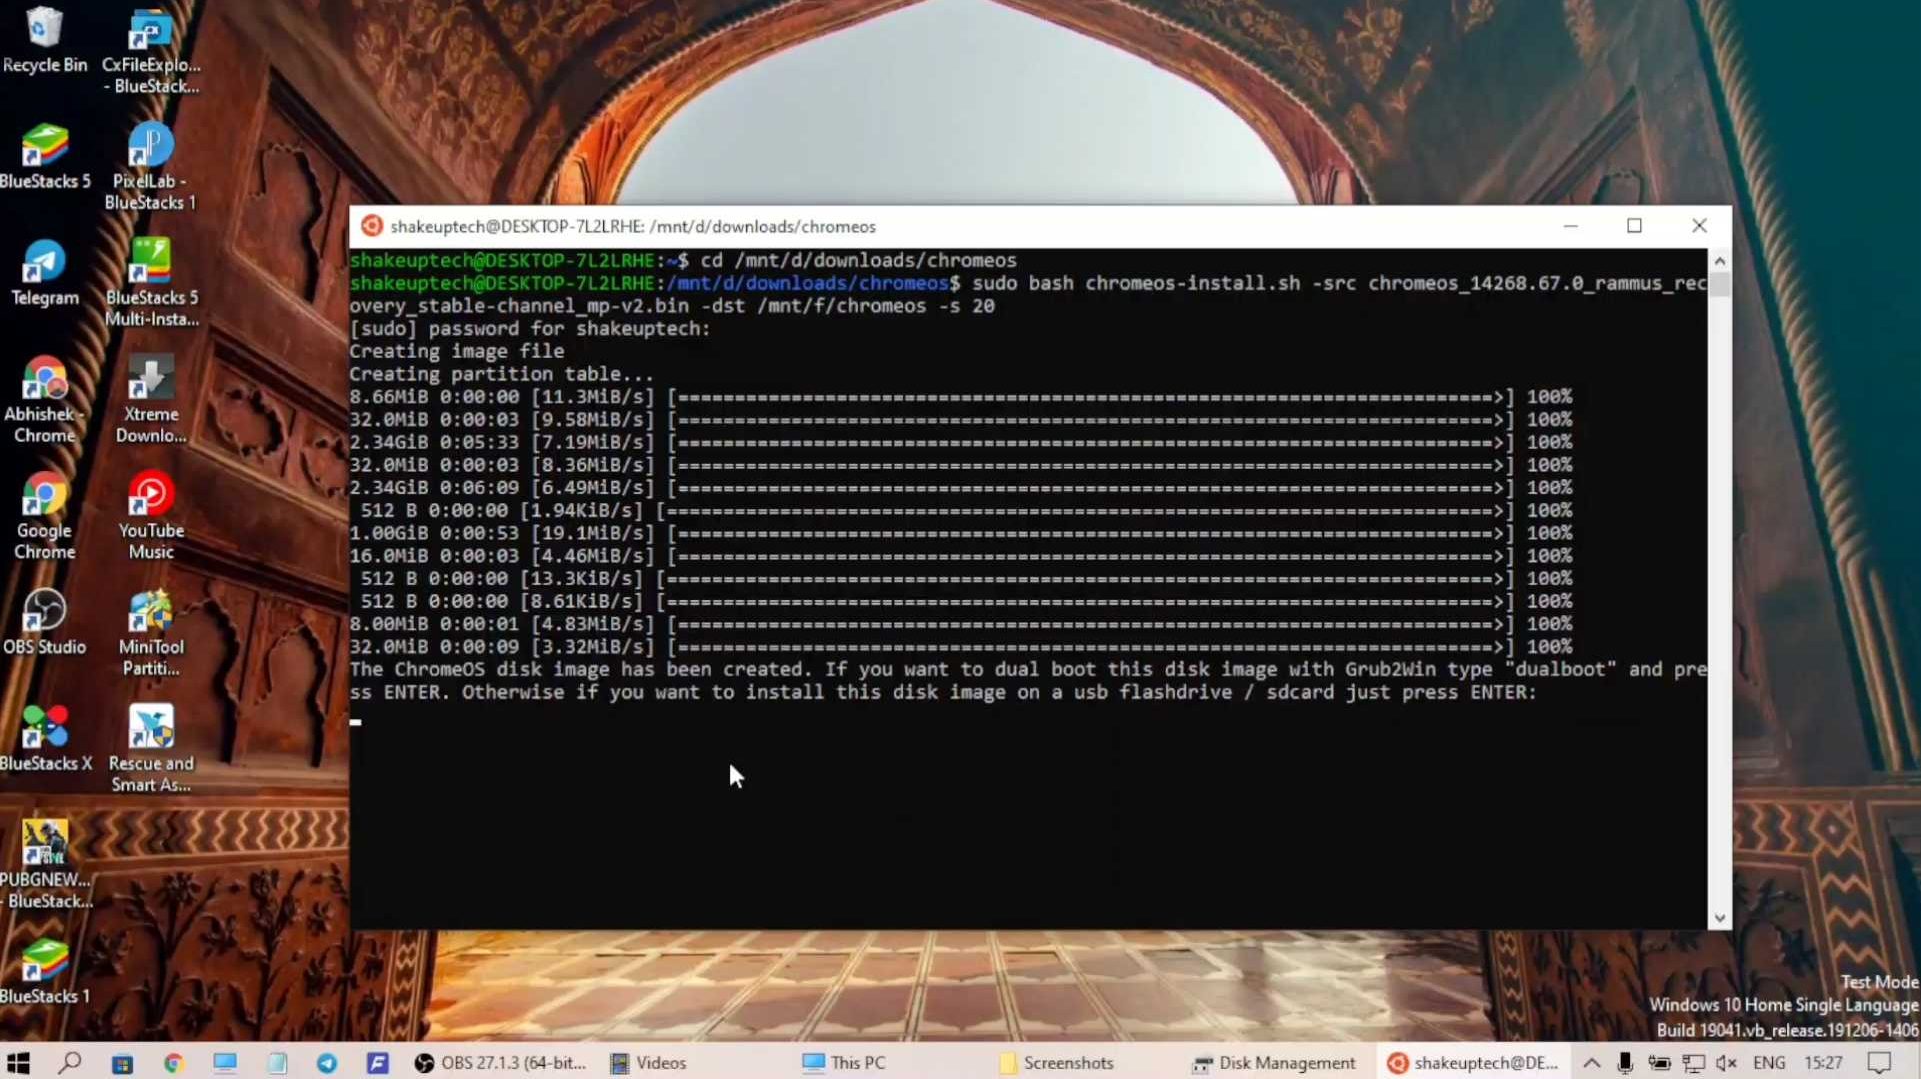
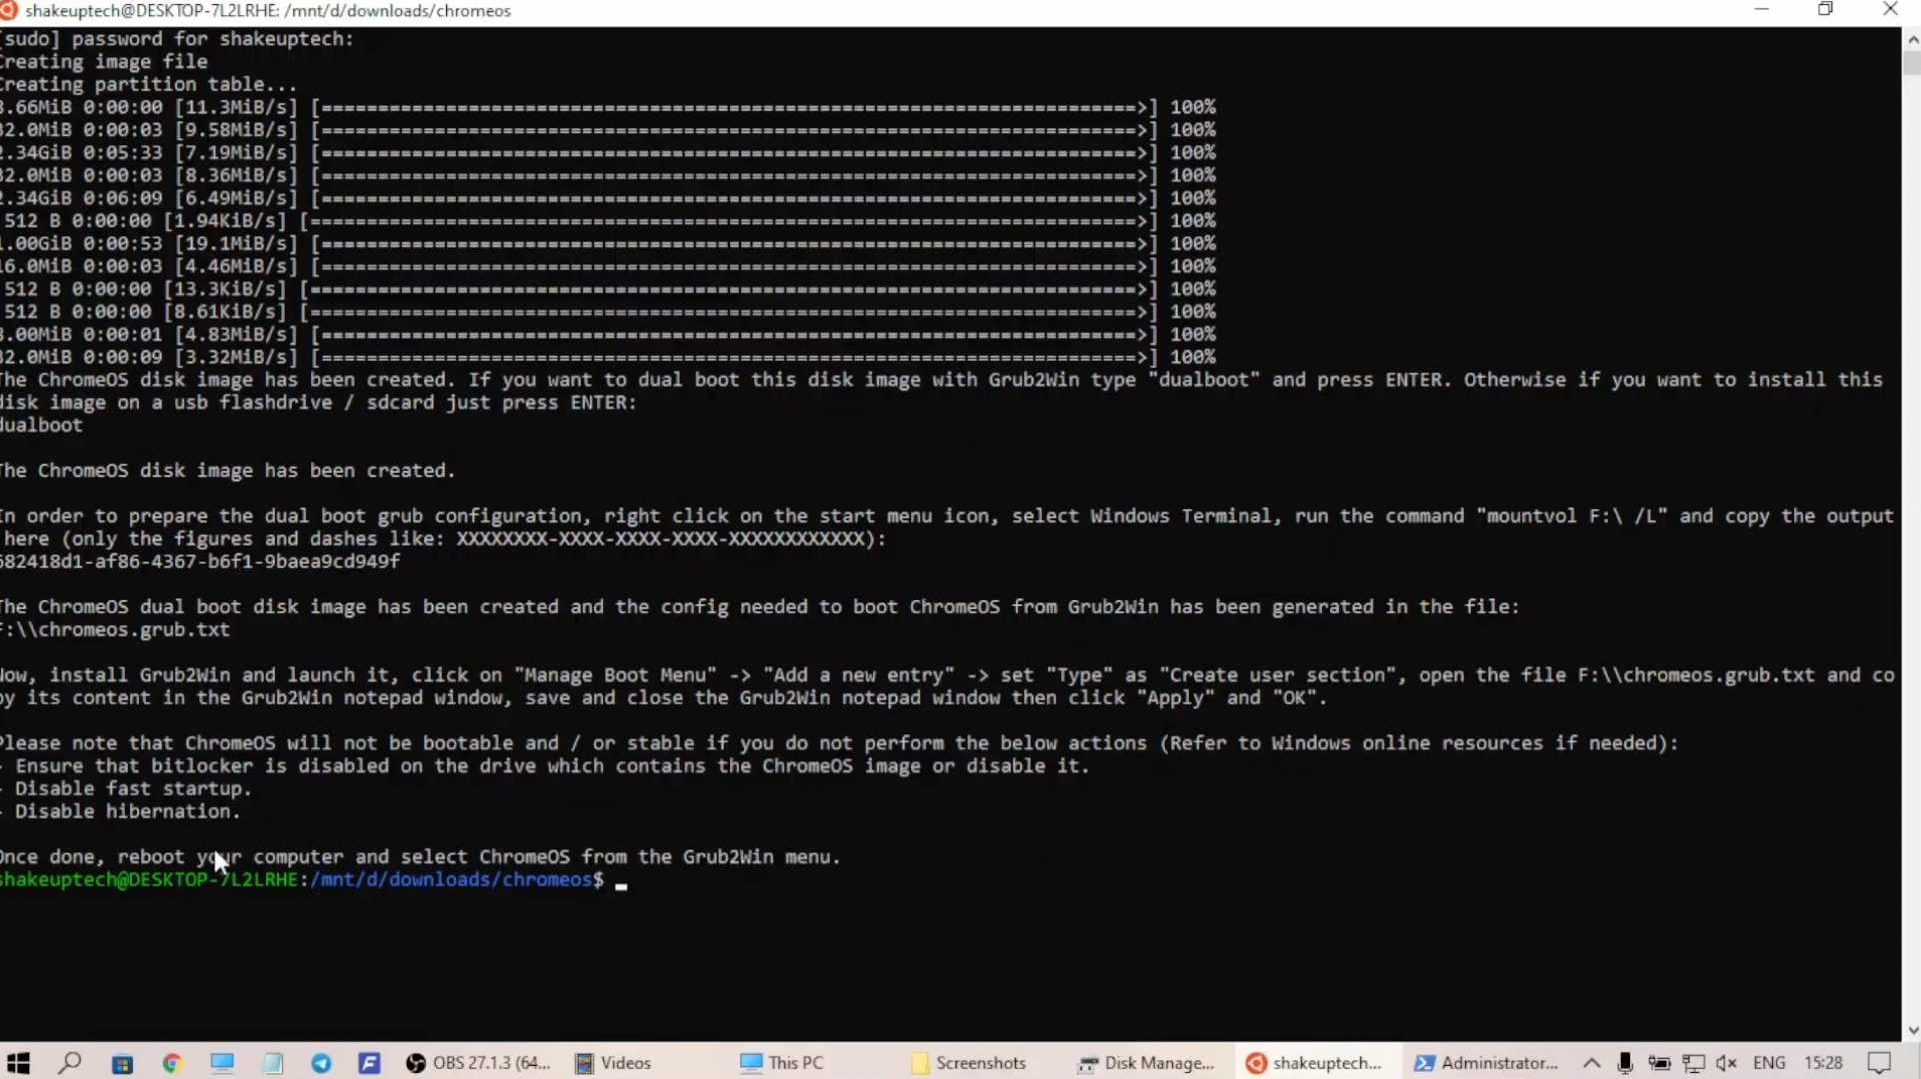
After the process is done, it will ask to either continue with the single boot installation of Chrome OS or dual boot installation. We need to type dualboot without spaces and hit enter. this will create a grub2win txt file in the Chrome OS partition. You can close the terminal after making sure that the Txt file is present in the partition.
Grub2Win For Dual Boot Menu
- Now open the Grub2Win setup file and continue to run if prompted. The installation will take some time to complete. Make sure your secure boot is disabled otherwise, grub2win will not install successfully.
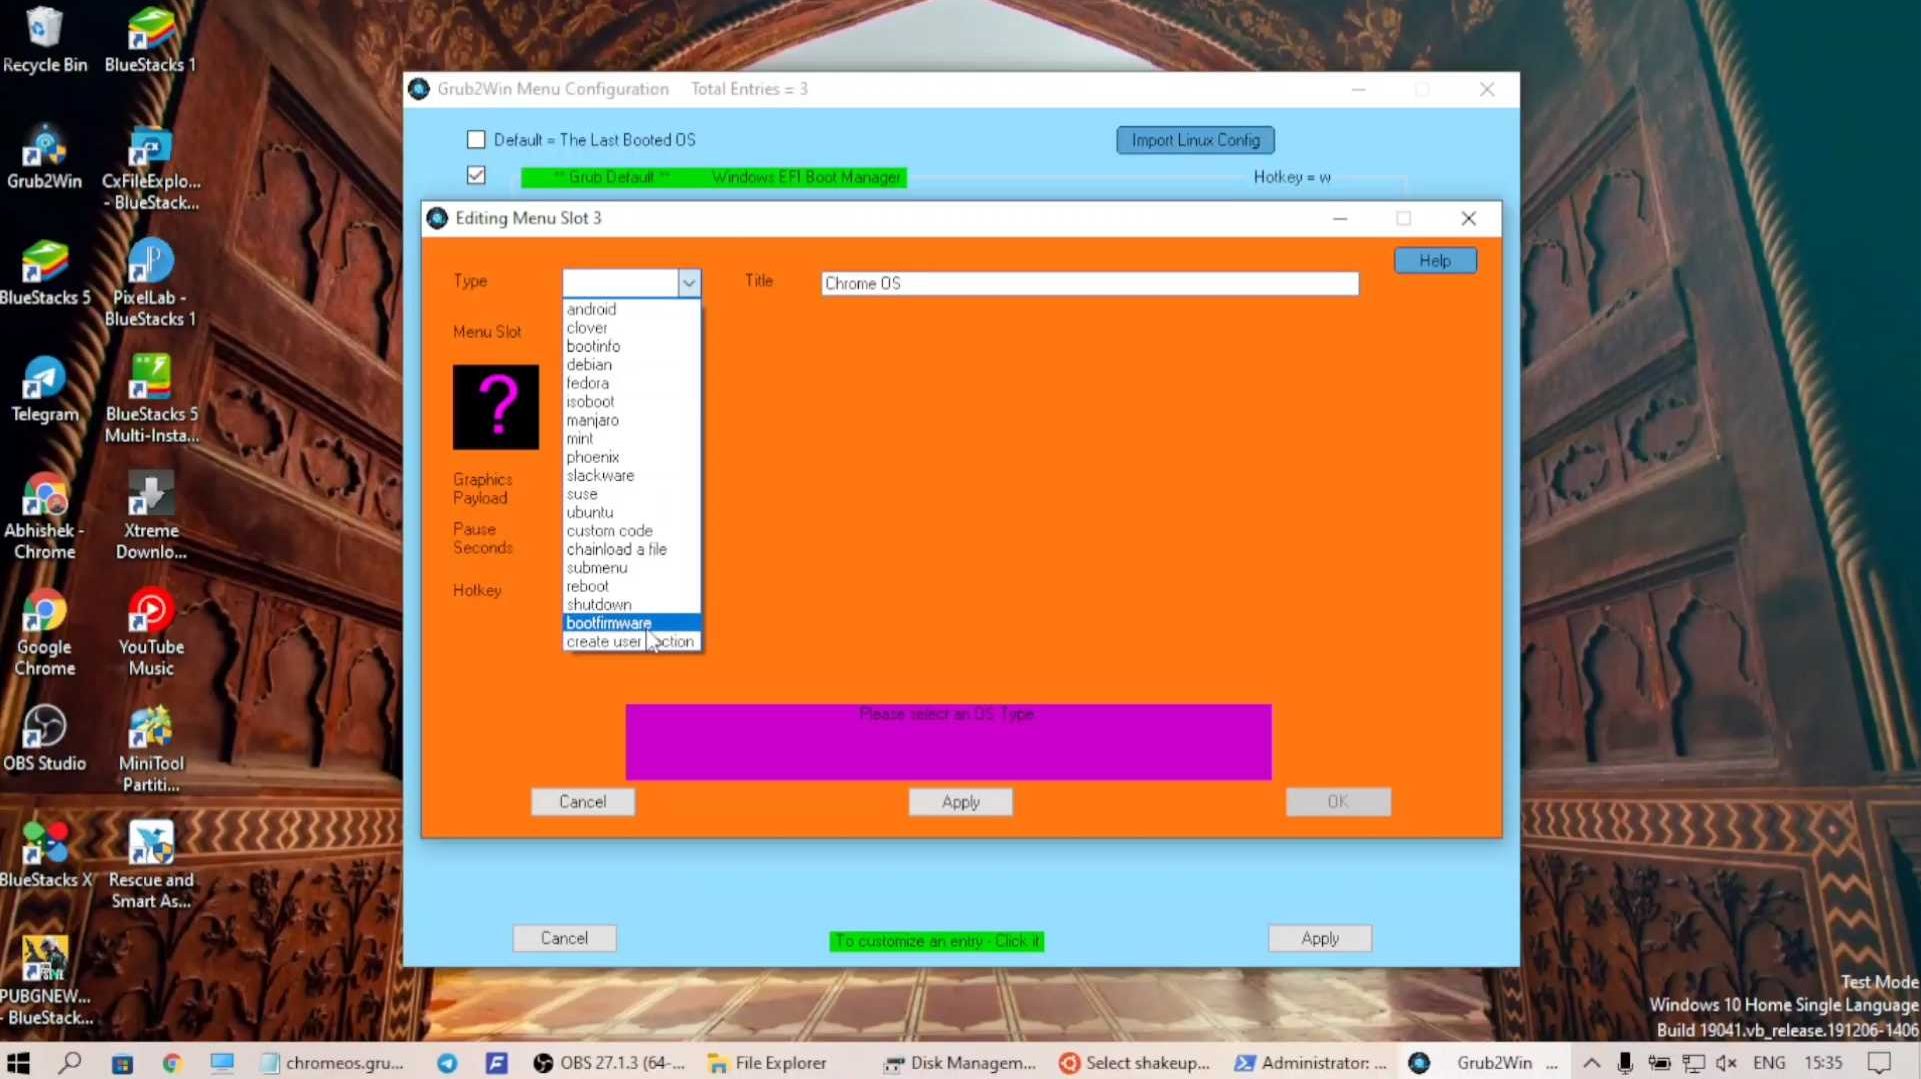
- After it has been installed we will open the “Manage boot menu” and create a new entry. Name it Chrome OS and in the Type section select “User Creation”‘ It will open up Notepad.
- Now we need to open the chromeos folder that we created inside the Chrome OS partition. Here, open grub-menu.txt and copy all the commands. Paste those commands in the Notepad and close and save it. Now hit Apply and select OK.
- If you see errors like Chrome OS is not supported or such, just ignore those and continue. Also, make sure to save the config file quickly after pasting it.
1.8. Dual Boot Chrome OS and Windows
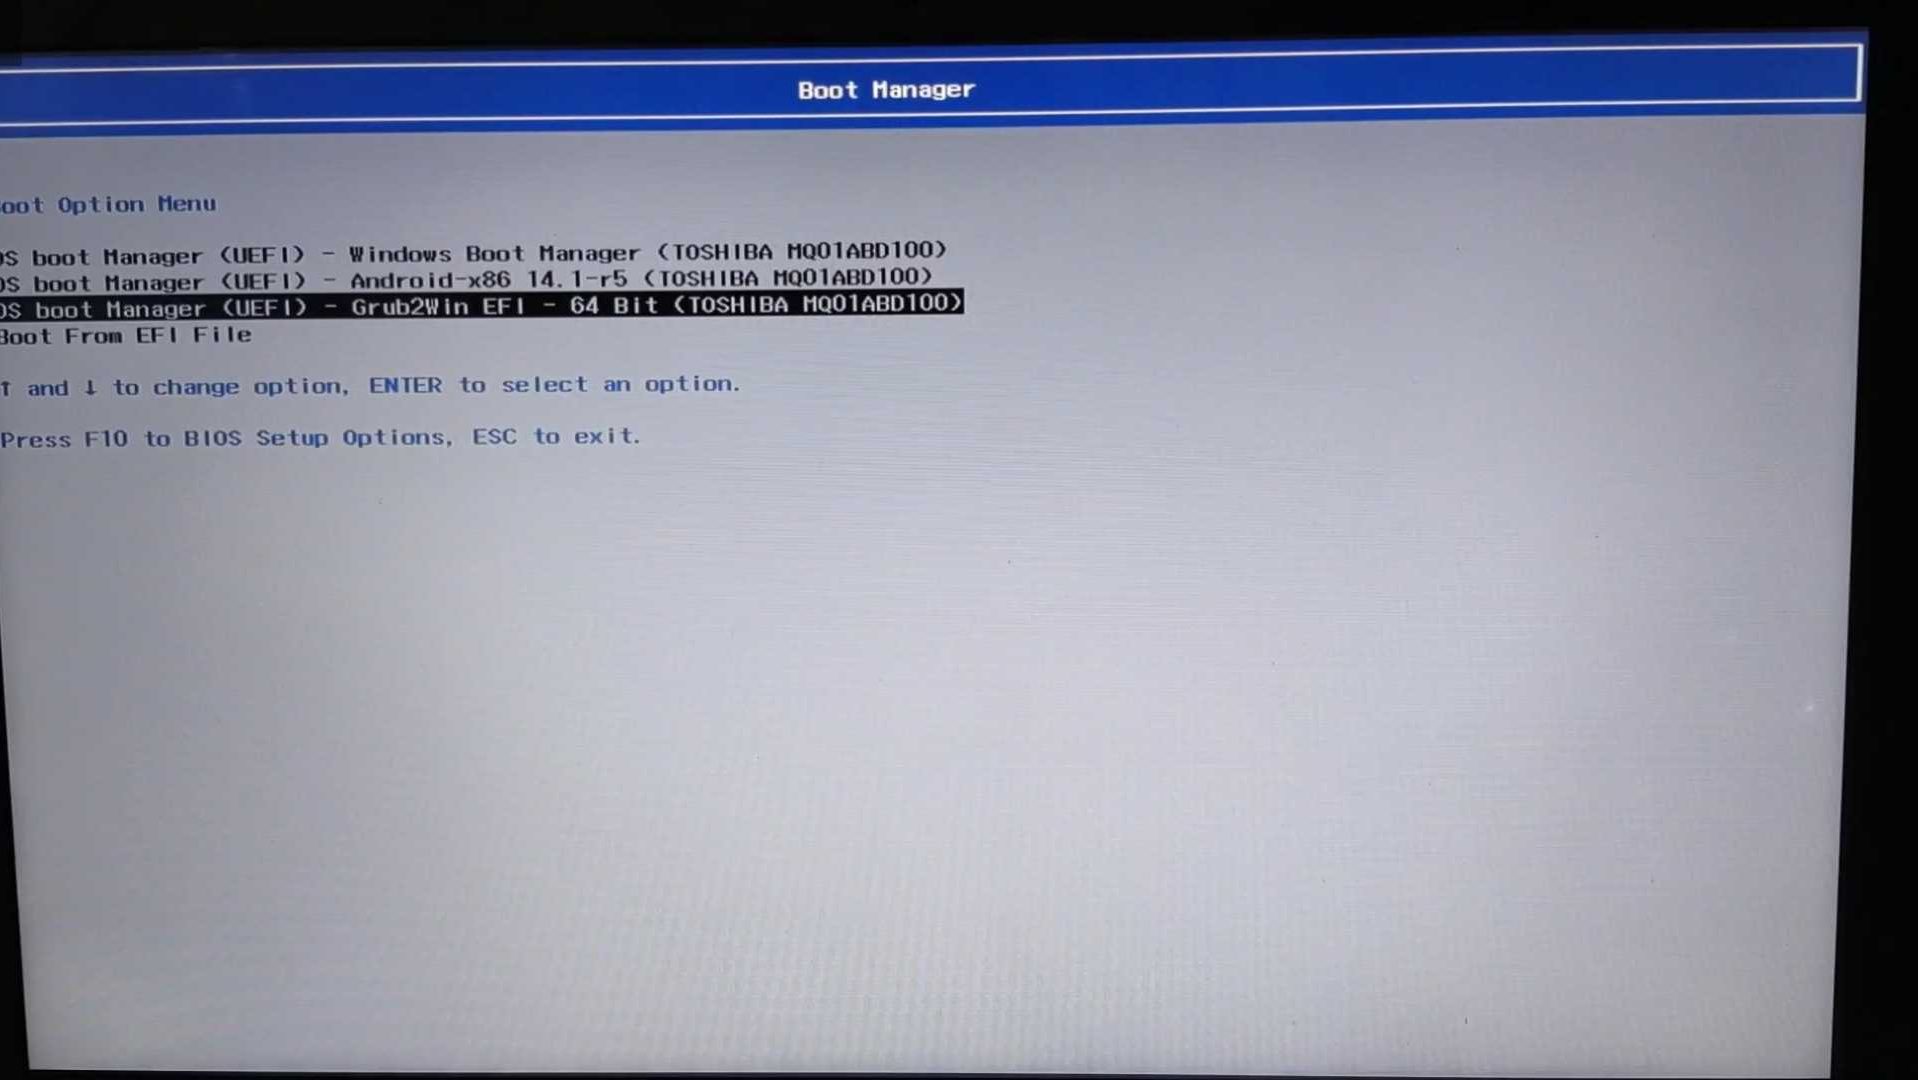
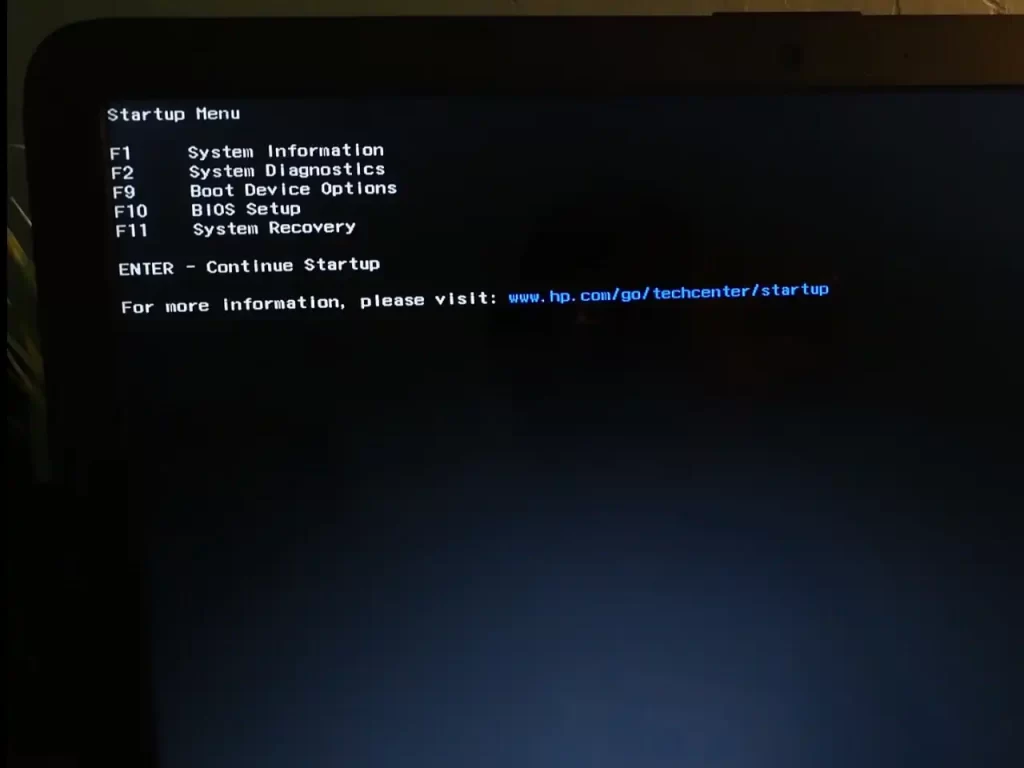
Now we will restart our system in BIOS and select Boot Device Options. Now select Grub2Win Boot Manager and using the down arrow key you will see Chrome OS name. Hit enter and you will see the Brunch framework logo.
It will take some time but eventually, you will see the Chrome OS logo and the setup screen. Just set it up and start using your Chrome OS with Play Store support.
2. Dual Boot Chrome OS and Windows 10/11 with Linux Mint
System Requirements
- 64 Bit Computer System with 16GB or more space
- Secure Boot Disabled from BIOS
- Hyper-V or Virtualization is enabled from BIOS
- 16 GB USB or above
- UEFI Boot
- Intel CPU from 8th Gen or above
- Celeron processors are supported as of Goldmont or later.
- AMD Ryzen
- ARM CPUs are not supported
Disable Hibernation and Fast Start-Up
- To successfully dual boot Chrome OS and Windows, we must disable hibernation and fast startup. Open the Windows terminal and here type, “
powercfg.exe /hibernate off“. This will disable hibernation mode on our system. - Now to disable fast start-up, we will edit the registry of our Windows computer. Right-click on the Windows key and run “Regedit“. Here follow this path, “
HKEY_LOCAL_MACHINE\SYSTEM\CurrentControlSet\Control\Session Manager\Power“. You can paste this into the path dialogue box. - We need to locate the HyberBootEnabled option, right-click it, and modify it. Change the value from “1” to “0.” This will disable the fast start-up option.
Disable Secure Boot
- We need to disable secure boot from the BIOS of our computer. Different manufacturers have different keys to enter the BIOS. You can find the BIOS keys for various companies below.
- While you are here and if your system is a bit older. Also, find something called the “legacy boot” and disable that as well. Alternatively, if you see the option to switch boot to UEFI, then make sure you do that.
And lastly, we need to enable options related to virtualization. It is called Hyper-V for some and just virtualization for others. On modern computers, it is enabled by default. So, if you don’t see such an option, then it must be enabled already.
Files Needed
- Installing Chrome OS as a primary operating system is simpler than dual-booting it with Windows. Even the files we need are similar but there are a couple of new additions to the list. First, we need the Linux Mint OS file which is a type of Linux distribution. This will help us to flash the Chrome OS to our system.
- We can download the Linux Mint image from this link and download the latest release. Next, we need to download the Brunch Framework to make the Chrome OS work on our system after flashing it. A GitHub user named Sebanc has made such a framework file for us to utilize. You can download that file from here.

Intel
- 6th gen & 9th gen: “shyvana” for Intel / “bobba” for Celeron.
- 10th gen: “jinlon“.
- 11th gen & above: “voxel“.
AMD
- Ryzen: “gumboz“.
- To dual-boot Chrome OS, we need to create a new boot menu. For that, we need a program called Grub2win. Download the program from this link. We also need a script that we will run in the terminal window to dual-boot Chrome OS. This script is called the multi-install script. Download it from here.
- For the MBR Boot system, download the MBR patch file from here (not guaranteed to work).
Initial Process
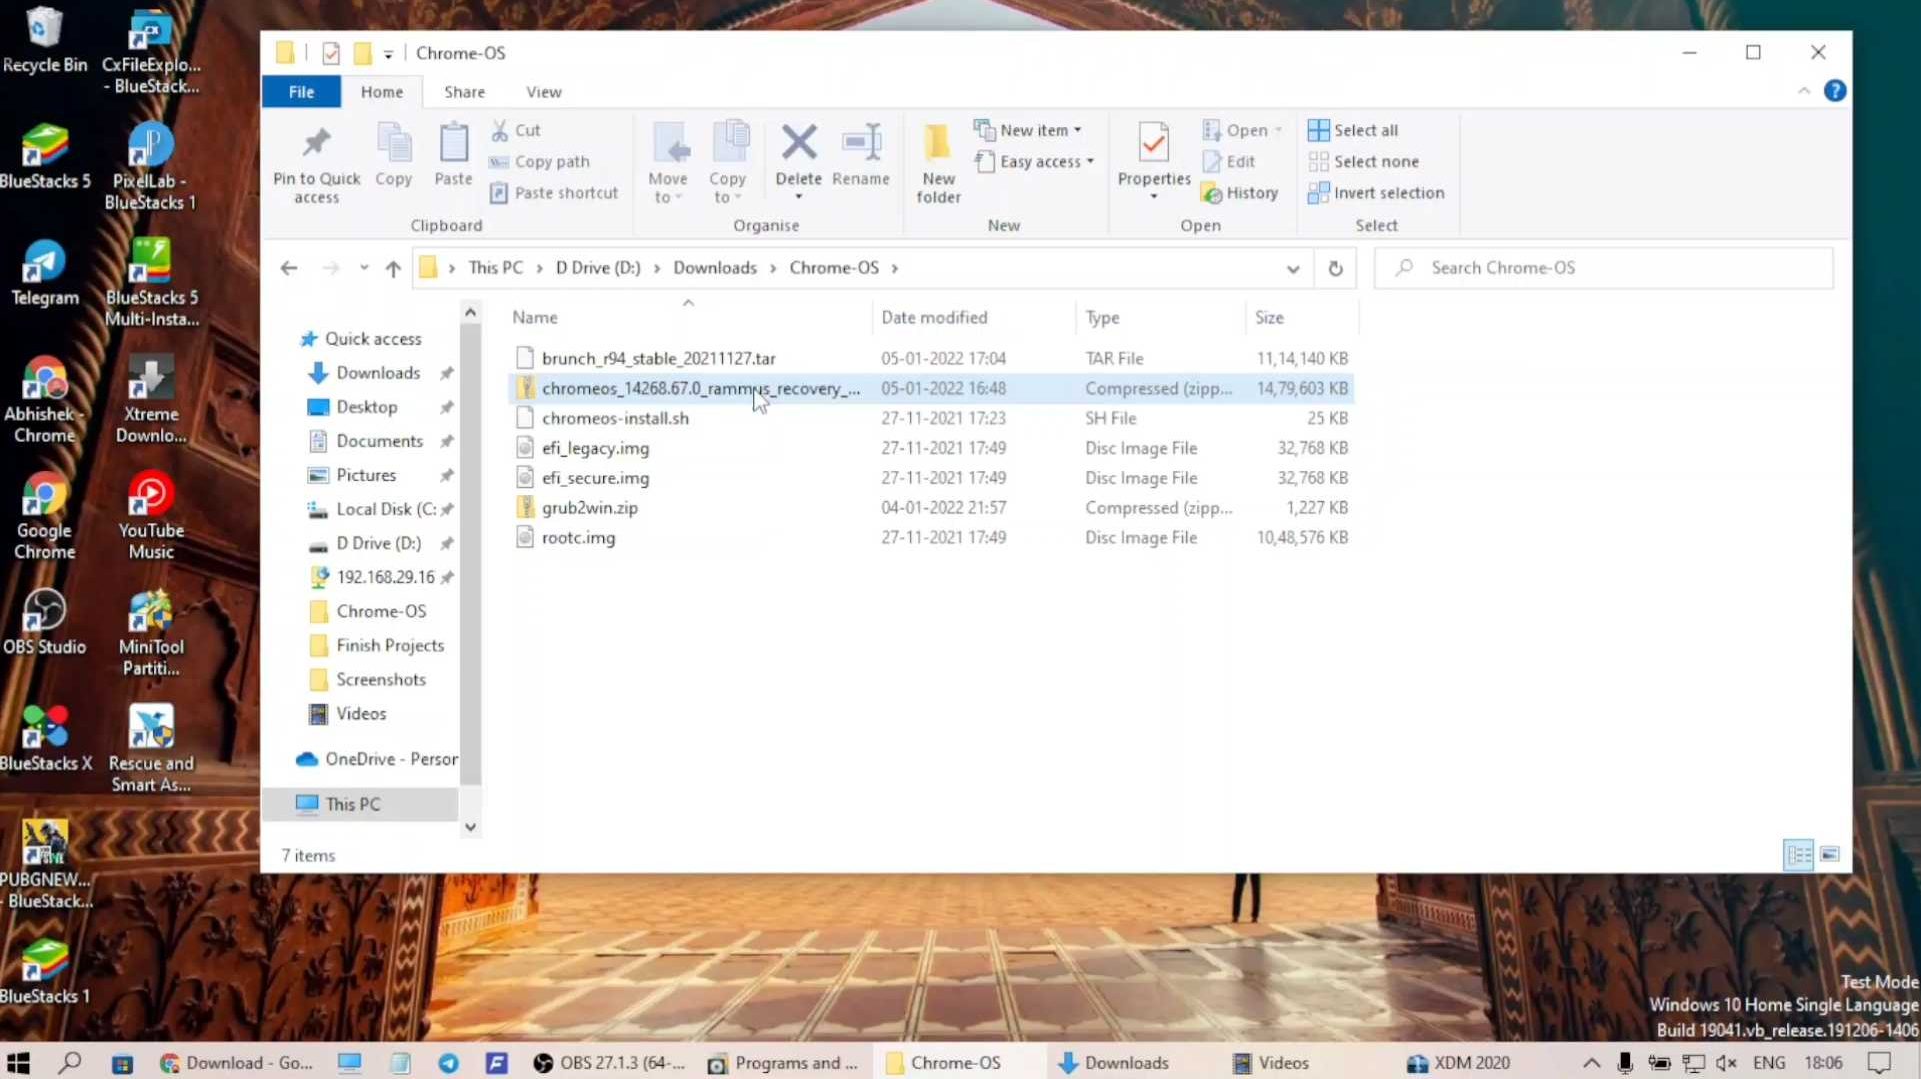
- Let’s start by extracting the files we downloaded earlier. Create a new folder called Chrome OS in the downloads folder. Extract the Brunch framework file and Chrome OS recovery image file. The Brunch Framework file is a tar.gz file, so we need to extract it twice. In the case of MBR, extract the patch file the same way and it will overwrite existing files in the folder.
- After extracting the Chrome OS recovery image we need to rename the file obtained. For example, if you downloaded the Rammus image. Rename it as rammus_recovery.bin and for Zork, it should be zork_recovery.bin respectively. Move all the files thus extracted into the Chrome OS folder. Also, move the muti install script to the folder as well. Leave the Linux mint and grub file outside.
Create Partition
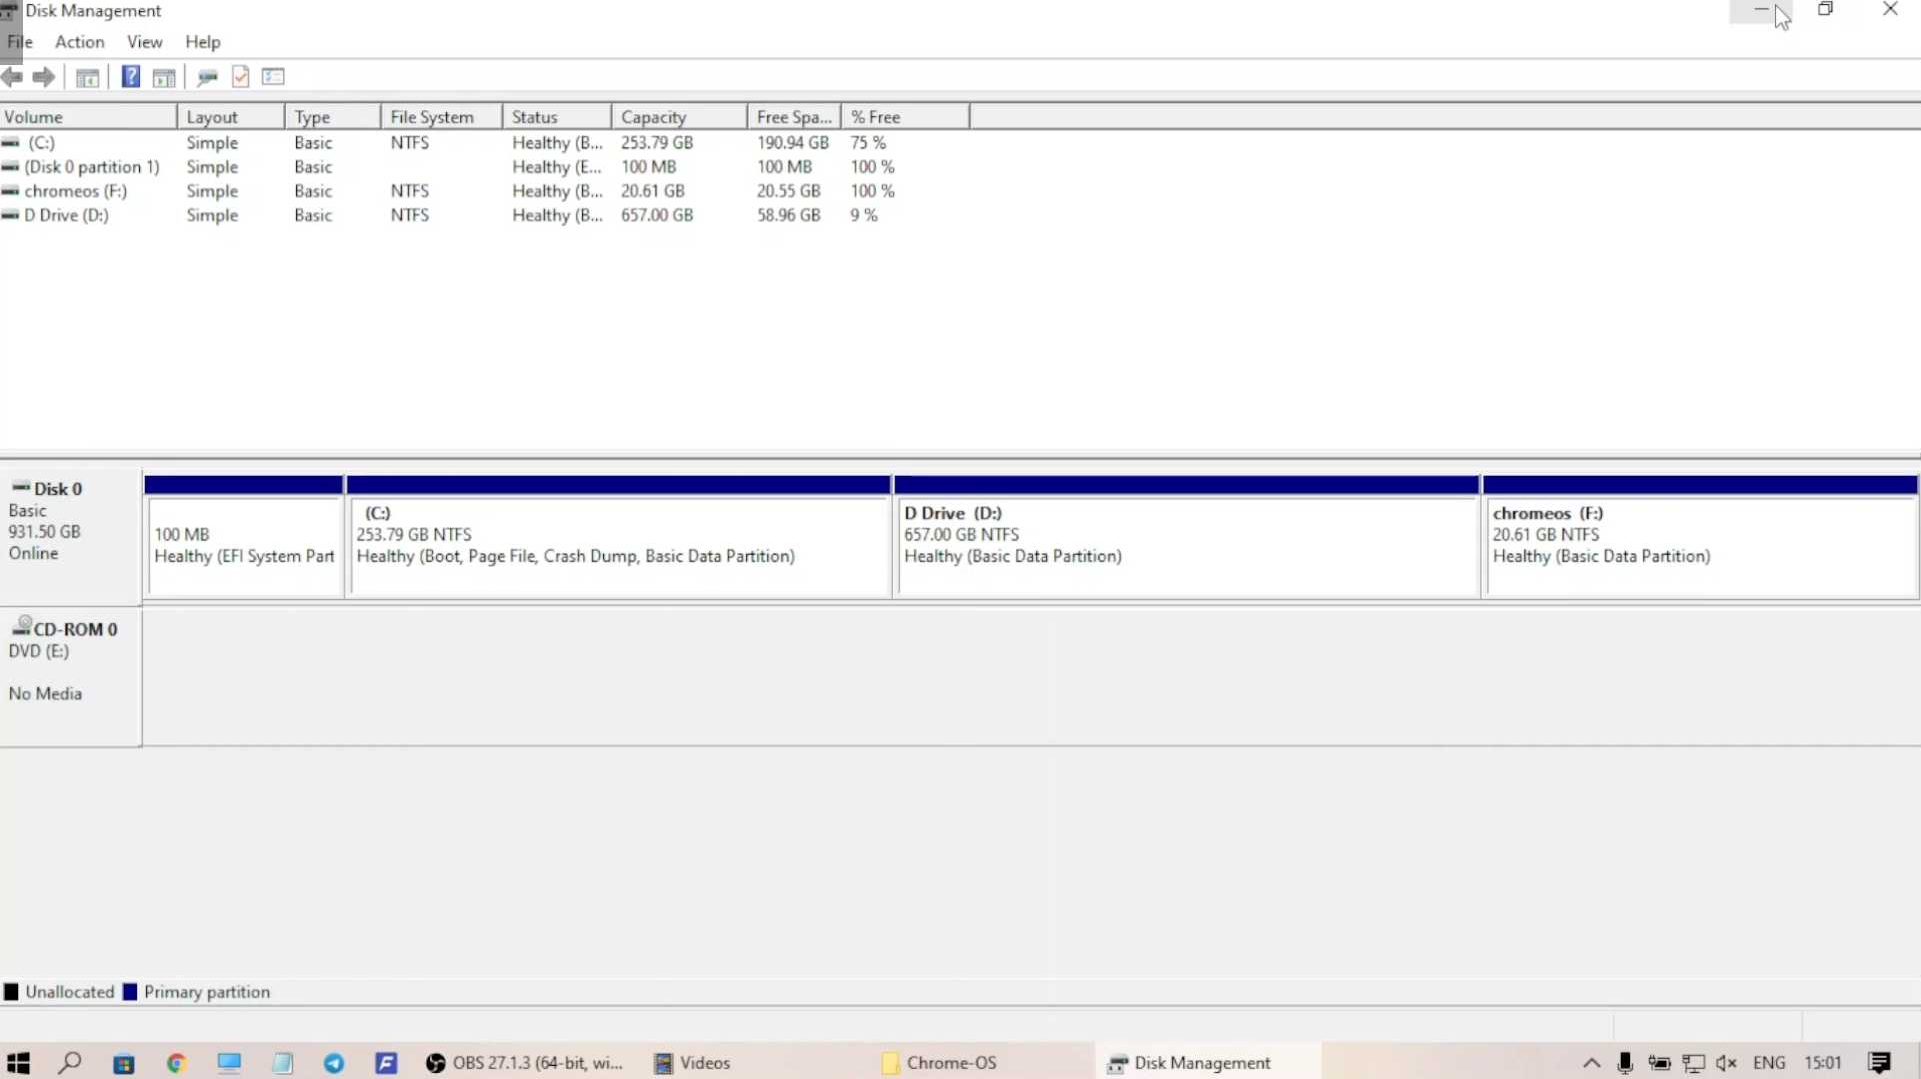
We need to create a partition in our drive to dual-boot Chrome OS. Open the search window and type partition. A program called Disk Management should appear. Open the app and it will show all the storage details and different partitions. the drive other than the C drive should be shrunk for this new partition. Right-click on the D drive as in my case and click shrink.
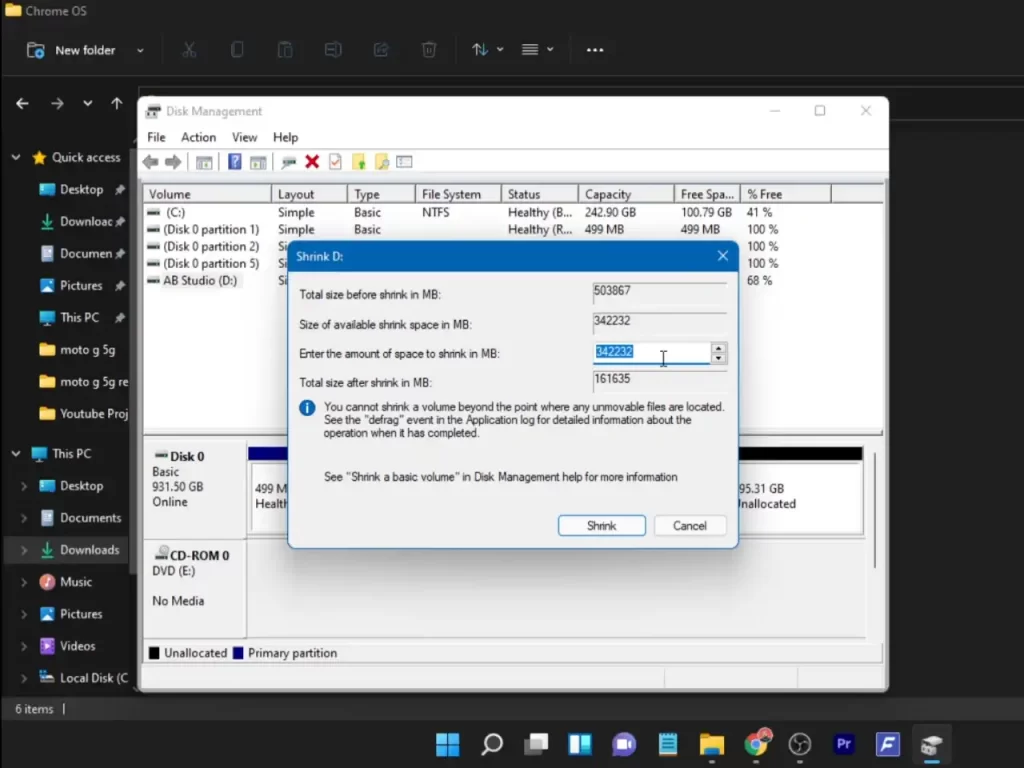
- We have to put in the values for the storage space we want to allocate. The values will be in MB so choose wisely. I decided to make a 200 GB partition so I chose 200000 MB. You can choose anything upwards of 100GB. Follow the process and your new partition will be created.
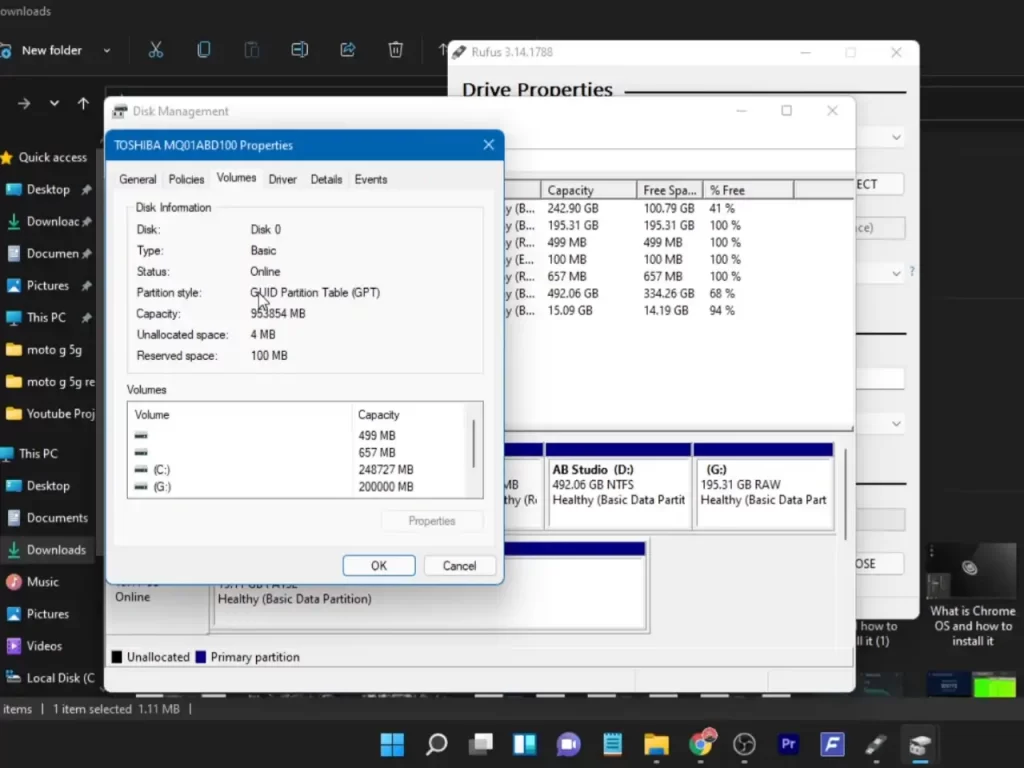
- While you are here make sure to check your storage partition scheme as well. Whether it is a GPT or MBR scheme. Right-click on the left area where it’s written Disk 0 and select properties. Now under the volume tab, you can see your storage partition scheme. Note it down as we will need it while making our bootable USB drive.
Create a Bootable USB
- We need to make a bootable USB drive with Linux Mint OS. We will then boot into Linux Mint OS to flash the Chrome OS. First, we need a USB drive of 8 GB or more. Then, download a program called Rufus if you have not already.
- Open the program and select the Linux Mint ISO image. Choose the partition scheme according to our previous step. Leave everything else as default and press start, It will then format your USB drive into a bootable drive.
Read How To Create Bootable USB For Multiple ISO Files
Entering System’s BIOS
We need to enter our PC or laptop’s BIOS option to boot into Linux Mint. For HP laptops, the key to enter bios is the ESC key or F10. Restart your computer and as soon the screen lights up press the BIOS key and it will show various options. We need to select the Boot options and then select our USB drive. The system then will boot up from the USB drive which will then boot the Linux Mint OS.
Using Linux Mint
After booting into Linux Mint we do not need to install the Operating System. We can just use this interface to install the Chrome OS. Connect the system to an internet connection via WiFi or Ethernet.

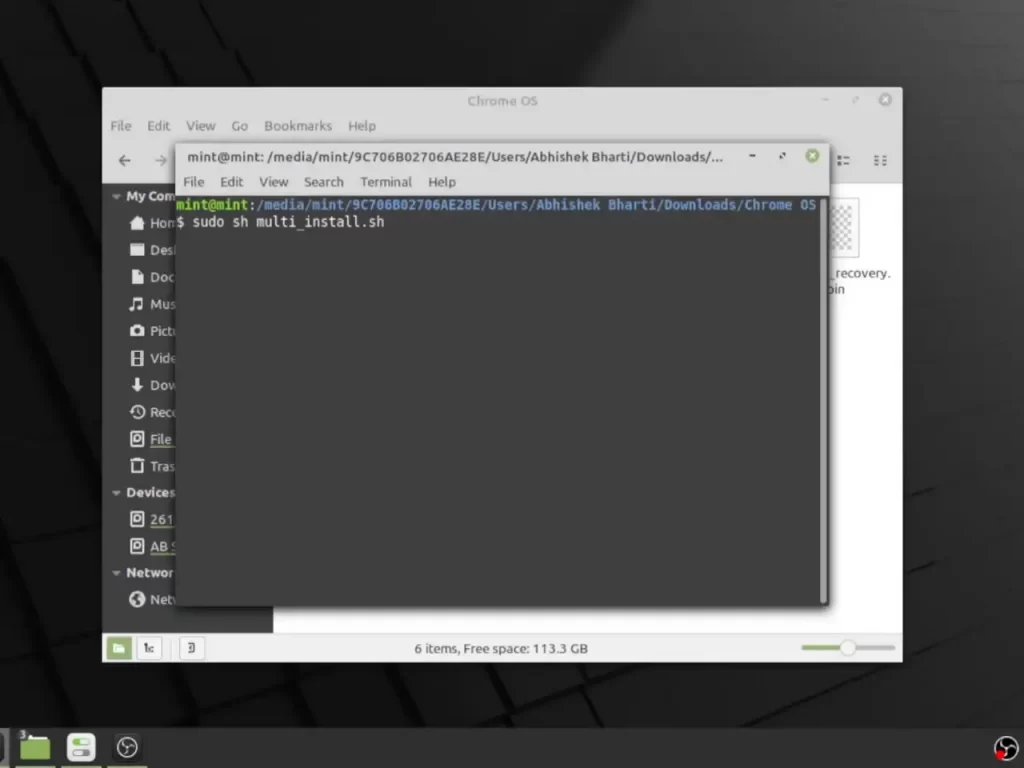
Open the computer icon and then select the drive where the Chrome OS is located. In the Chrome OS folder, we need to press right-click and select open in the terminal menu. Once in the terminal interface, we need to run some commands. First type sudo sh multi_install.sh and press enter. The process should start.
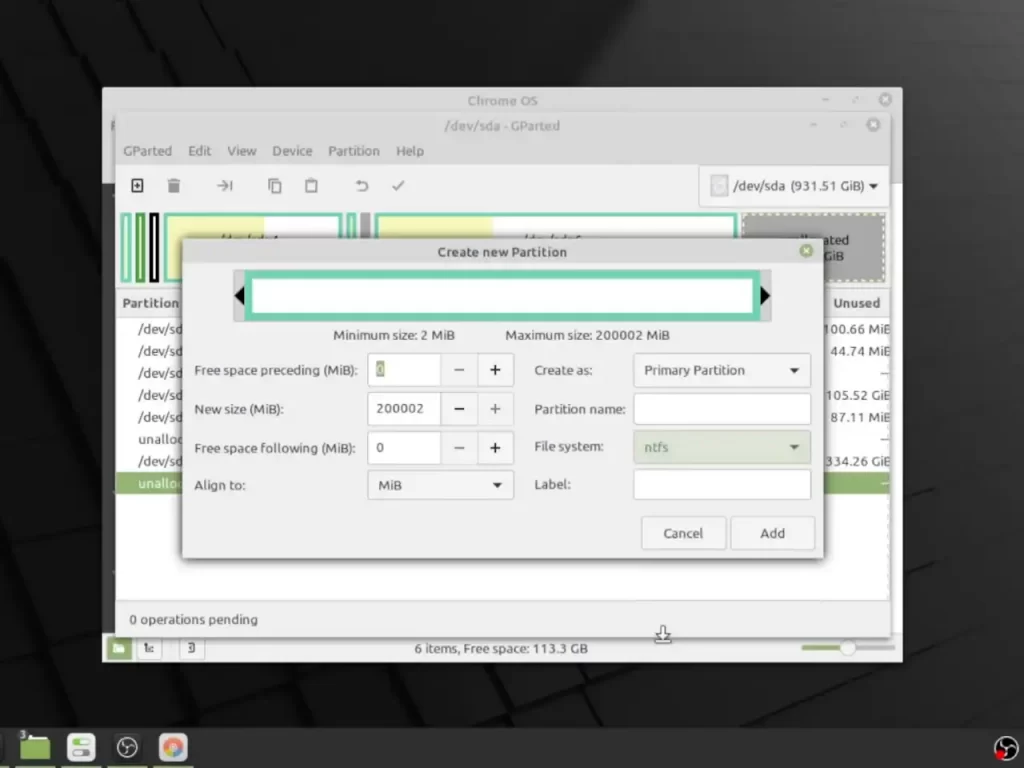
- After the process is done there will be a new window opening up. It will list down all the partitions on our computer. We need to select the partition that we made earlier. Then press the Plus icon on top.
- Now we need to format the partition and create a new partition for the OS. In the file system, select ‘NTFS’ and press add. Then press the Tick icon on top and confirm apply all operations.
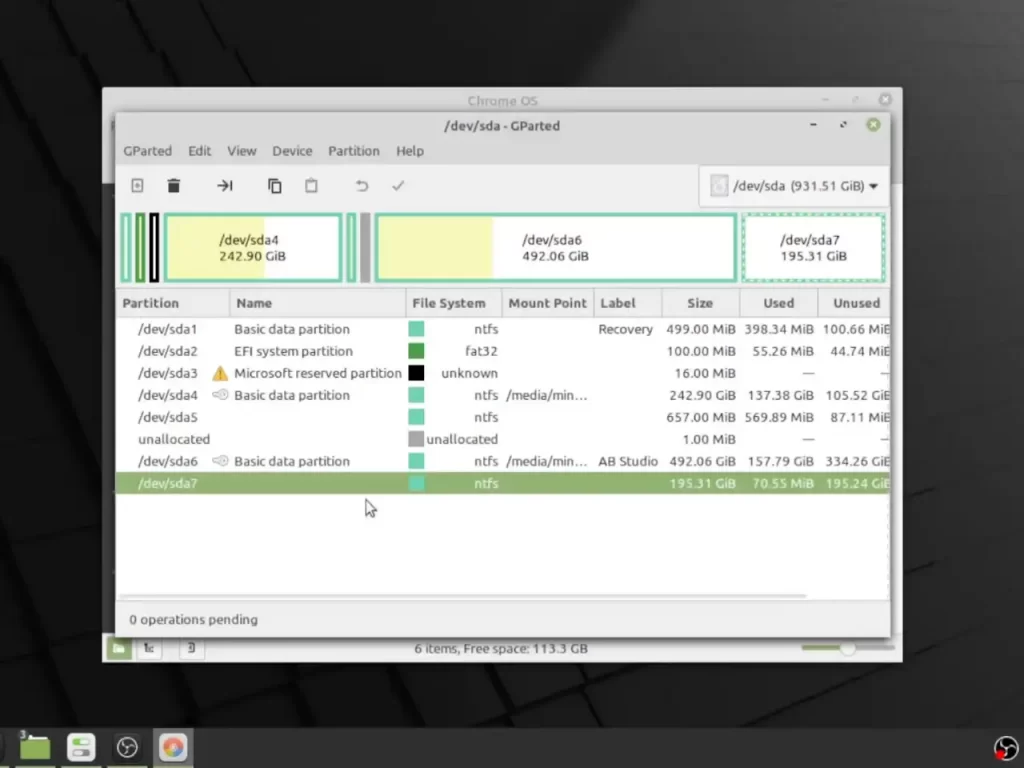
After it’s done creating a partition make sure to remember the name of the partition of the Chrome OS. For example, sda6, sda7, etc. When you will close the window you will be asked to enter the name of the partition in the terminal. For example sda6 or sda7, etc.
So type the name of the partition and press enter. Then type ‘Yes’ and the final process to install Chrome OS will begin. It will take some time though. After the installation is done there will be a pop-up window with some errors. Just ignore the error and close the window.
Dual Boot GRUB Menu
- Now we need to copy some text from the terminal. Locate the commands between a bunch of asterisks. It will start with a menu entry and end with closing curly brackets. We need to copy the text inside those asterisks.
- Then in the Chrome OS folder create a new text file or blank document. Then open the files and paste the commands. Save this file with the name of your choice as we will need it in a bit.

Editing Grub2WIn
- Now just reboot your system and you should be back to Windows OS. We need to install the grub2win program we downloaded earlier. It will take a long time to install it so have patience. Once it’s done you may see an error saying your secure boot is enabled.
- To fix it you need to enter your BIOS options and then select BIOS setup options. From here go to boot settings and disable secure boot and save and exit.
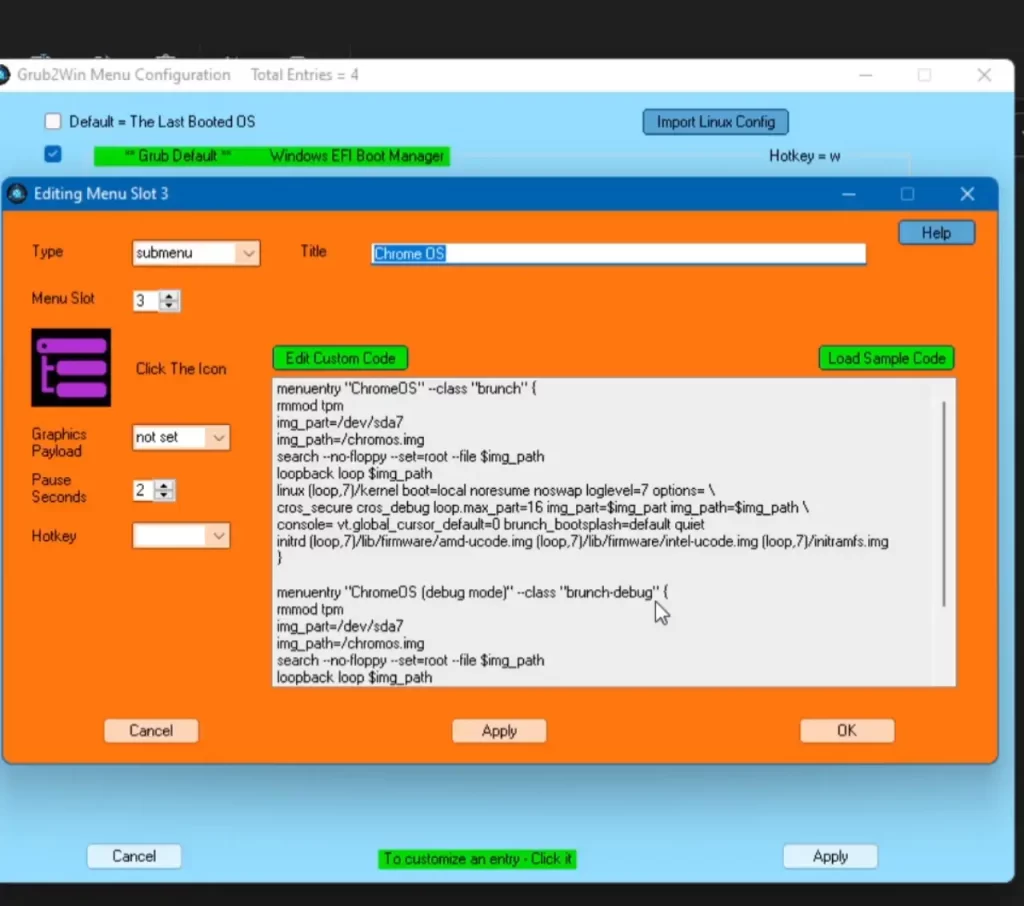
- Once done you will not see that error in the program again. Now in the program, we need to go to Manage Boot Options at the bottom. Then click Add New Entry and from here we will create our menu entry for Dual Booting Chrome OS.
- From the Type, drop-down select Submenu and rename Title as Chrome OS. Now click on Enter Custom Code and copy-paste the commands we copied earlier from the text file. Once done click Apply and OK and it’s done.
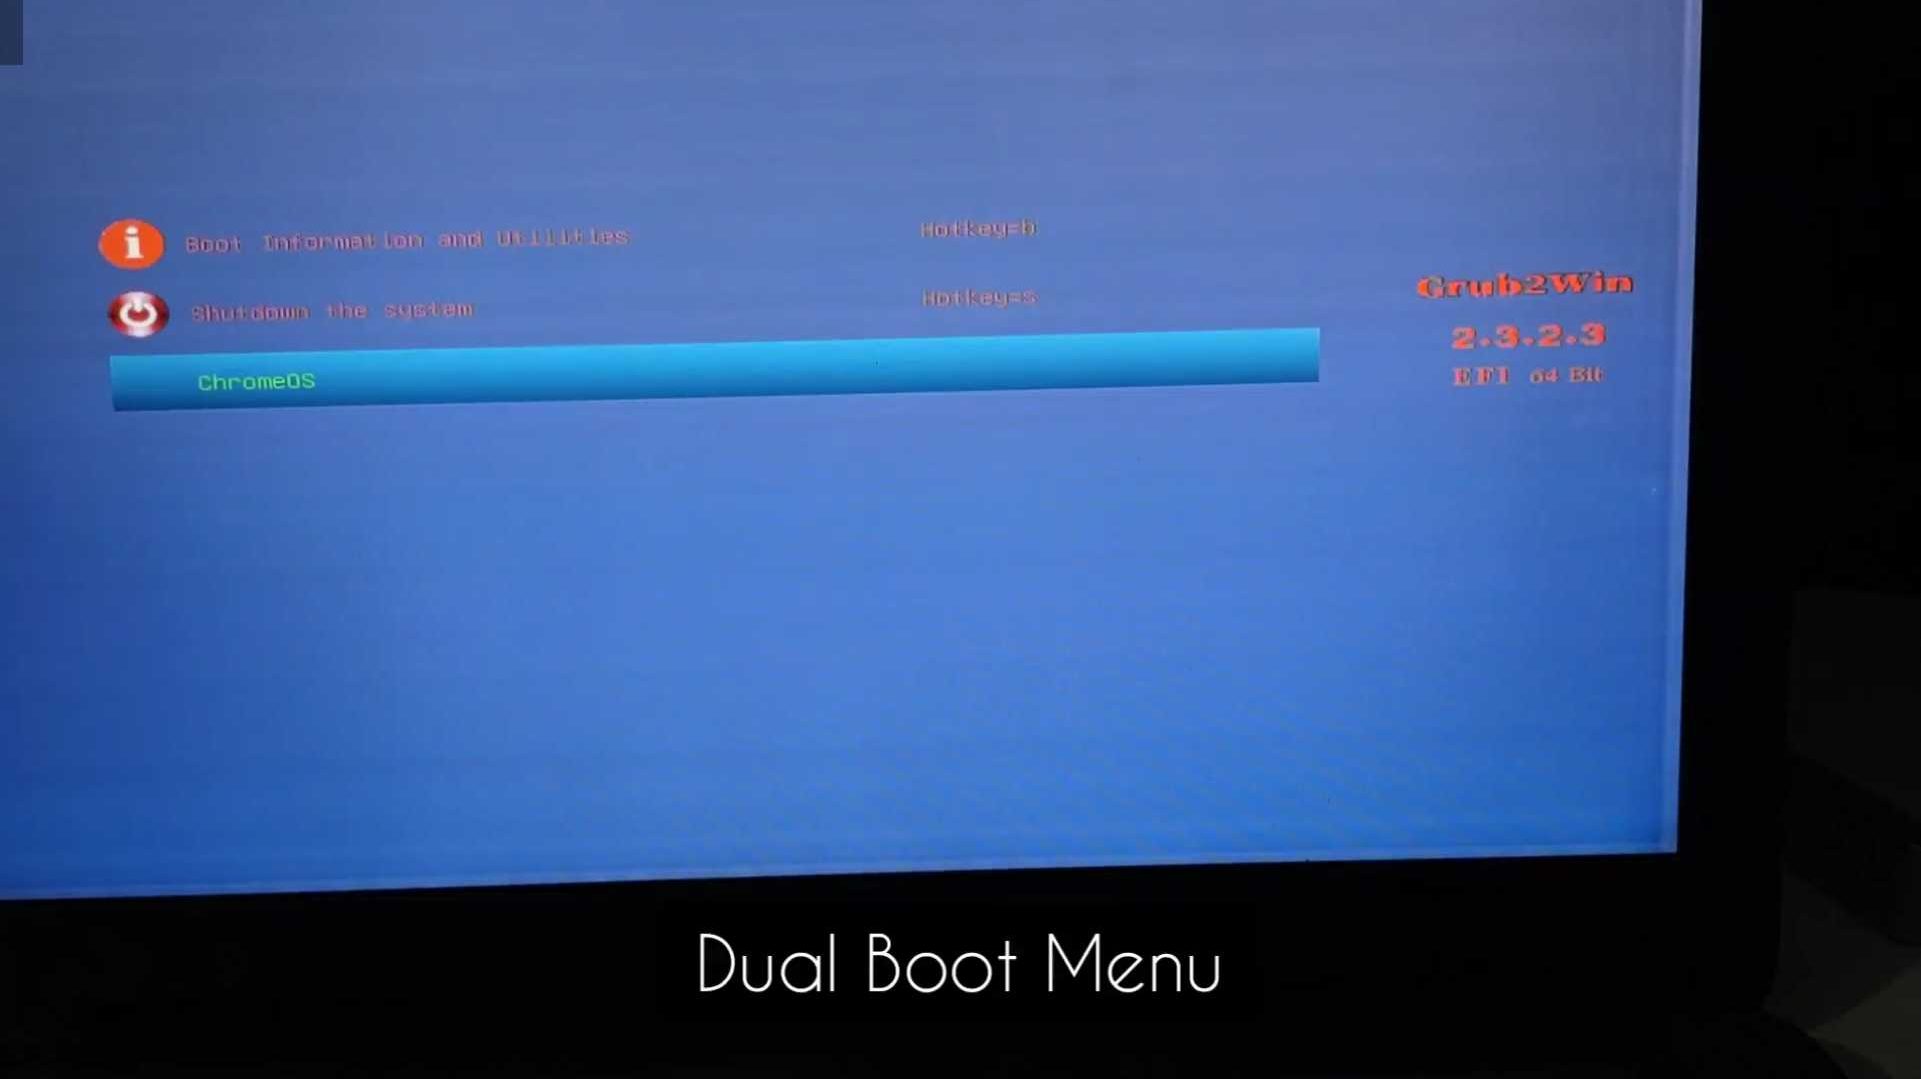
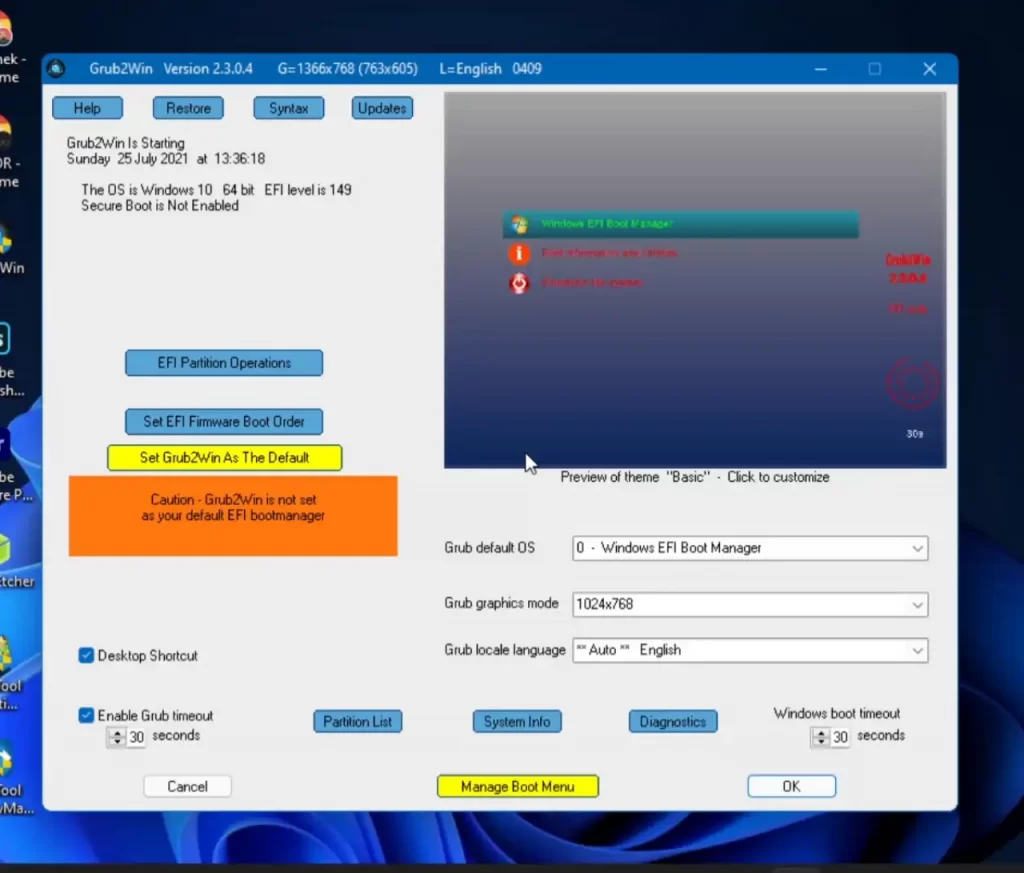
- You can also move up and down the position of the boot menu according to your needs. This is how it will appear when starting the system. You can set the Grub2Win as your default boot manager so you can choose between Windows and Chrome OS.
- You can also customize other options related to the interface as well. After everything is done click on OK and exit the program and your settings will be saved. So now we have successfully installed Chrome OS in Dual Boot.
Now when you restart your system you will see the Grub2WIn boot manager asking to boot either into Windows or Chrome OS. Select the Chrome OS again same then it will start loading the Brunch Framework.
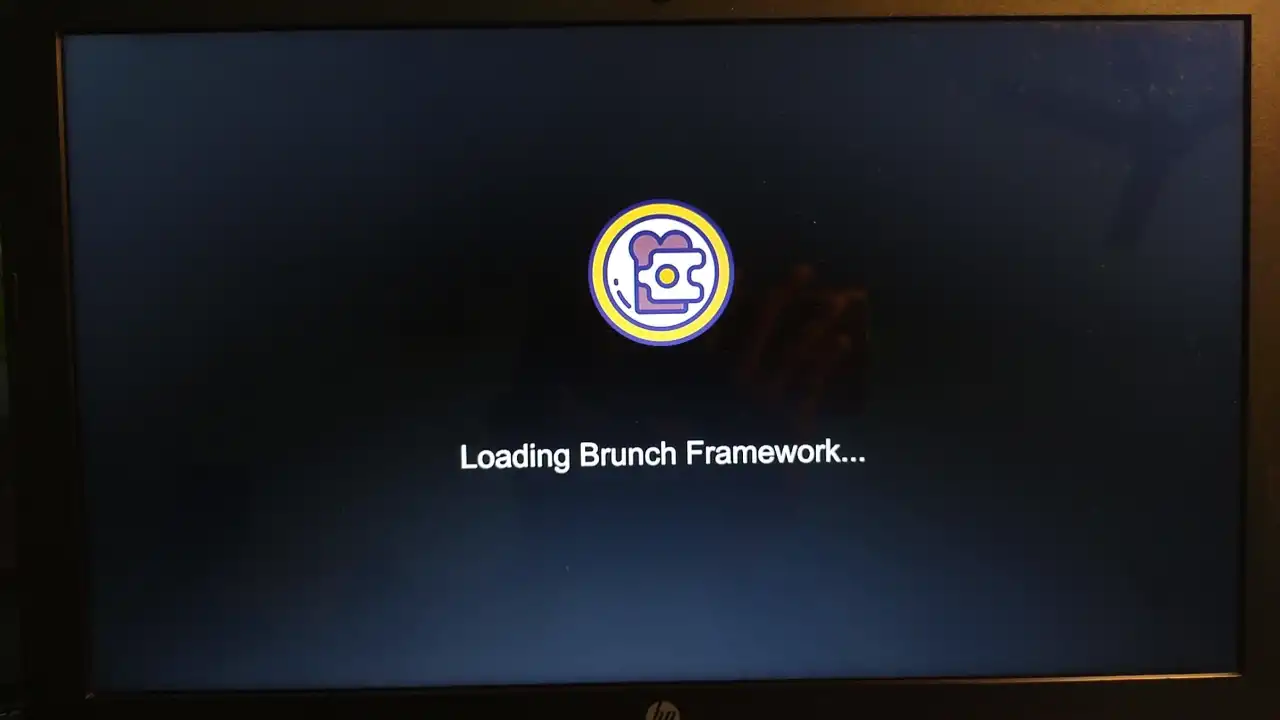
This will take some time and once done you will see the Chrome OS logo and the setup screen. it’s advisable to use a secondary Google account with this Chrome OS as Google officially doesn’t support third-party machines. So that was how to dual boot Chrome OS and Windows 10/11 using Linux Mint.
Check Out The Video Guide:
Review and My Experience with Chrome OS in Dual Boot with Windows
I’ve been a long-time user of the Chrome OS which is installed in dual boot with Windows. Android OS is something I’ve always wanted to try on my laptop. Moreover, I’ve tried many other Android OS like Bliss OS, Prime OS, Android x86, and more. But only after trying Chrome OS, I could finally be at ease. Mainly because it was coming directly from Google.

Chrome OS is entirely based on the Chrome Browser platform. This means most of its functions are web-related, whether it’s the pre-installed apps or the web apps. There are not a lot of things you can do without the Internet. Google Play Store does make a huge difference in this regard. Because unlike Chrome OS Flex where you’re completely dependent on the Chrome browser. Here you can download and install offline games and play them in the pass time.
Mobile-specific Android Apps
Additionally, the main advantage is being able to use Android-specific apps like Instagram or portrait-mode games like Subway Surfers. You can browse the web while you watch Instagram, YouTube Shorts, or similar apps. Furthermore, you have the entire Google Play Store to browse and install apps.

Another feature besides Android is the Phone Hub, where you can monitor your smartphone’s battery, notifications, and more. Additionally, you can reply, silence, and find your device too. We can share recent files and media directly from the Phone Hub. Otherwise, to share extensively we have the Nearby Share option, which works great. If you’re into the Android ecosystem then Chrome OS feels just right at home as your Google Account syncs everywhere.
Additionally, to fully experience the Android games, you’ll need a wireless controller. Another advantage is the presence of Google Assistant, which makes controlling smart devices more convenient. Furthermore, we also have Linux support which opens a whole new world of possibilities. It’s made for advanced users but you can try to play around.
Should You Install Chrome OS in Dual Boot?
Overall the main reason to use Chrome OS is the Android support and access to the Google Play Store. Another thing is that even though the OS is based on the Chrome browser, it’s still not like the full desktop version of the Chrome browser we see on Windows or Linux. You can manually install the Linux version of the Chrome Browser to fix this. For a normal user, it will make more sense to dual boot Chrome OS and Windows as Linux OS can get complicated sometimes.
Final Thoughts
You can check out the new lightweight Chrome OS Flex: The Chrome OS For Everyone!

I cannot succeed with the final step on dual-boot.
if you can virtually supporting me that would be very appreciated
I’m blind person but really would like to try with Chrom os with play store support
thanks
You can contact me on Instagram.
Hello,
Im experiencing the same problem. How could i resolve it?
When i try to mount the folder for chrome os it doesnt find it.
You need to make sure the names of the folder are correct with no spaces.
Hello , I liked this OS, but is the website for downloading the image safe?
Yes, it is provided by Google.
Your instructions are clear and worked for me – thank you.
One minor point – the link for the Chrome OS Recovery Image (https://cros.tech/) in section 1.5 is missing.
Thank you for your help
Thanks for pointing it out.
Hey, there is a mispelling at 1.6 , the last input to Powershell:
Wrong: “mount vol F: / \ L”
Correct: “mountvol F: / \ L”
“mountvol” instead of “mount vol”
Thx for this great description…
Thank you for this detailed step-by-step instructions!
I encountered some issues with installing pv & cgpt but managed to use standard Ubuntu terminal commands to manually install them.
However, I’m stuck now and unable to boot ChromeOS.
At Step 1.7: “Now we need to open the chromeos folder that we created inside the Chrome OS partition. Here, open grub-menu.txt and copy all the commands. Paste those commands in the Notepad and close and save it. Now hit Apply and select OK.”
I could not locate the chromeos folder I created earlier but instead saw the chromeos partition file that is 19Gb in size. I did not find ‘grub-menu.txt’ but another file named ‘chromeos.grub.txt’.
I proceeded to copy the contents of ‘chromeos.grub.txt’ into the Notepad window.
Upon rebooting, I was able to see the “Brunch” boot entry but it would not boot ChromeOS.
The splashscreen says “RootFS is being rebuilt…Please wait, this may take a few minutes” and it goes on forever.
Please help me understand what is wrong and how I can fix this.
Thanks!
Thank you for the detailed comment. Yes that process will take some time but it should boot in the end. Make sure you have disabled secure boot, hibernation and fast start up.
Thanks for the detailed and highly effective instructions. It’s obvious you really know your stuff.
I followed your instructions and so far so good…at least till now.
I’ve been unable to install Grub2Win. It keeps saying “Internet Connection Error” even though there’s internet and it works for everything else. I believe its supposed to download installation files, but it won’t connect online.
I’ve checked the internet connections, and it works for everything else. I even tried manually allowing the grub2win exe file through the system firewall, still the same thing.
kindly advise.
My System is an HP G7 250 laptop…running the latest windows 11.
Looking forward to your response.
Thank You.
Thanks for the post
bro it is showing cgpt needs to b installed first
I commented on video he told that there is cmd on website but i cant able to find it
It’s in 1.3 installing wsl
sudo apt update && sudo apt -y install pv cgpt
it worked 🙂🙂
thanks a lot.
keep up the good work 💯
Thank you for reading.
1º to 5º Intel gen are not supported.