Google’s new Chrome OS Flex does not come with Google Play Store or Android support. But the normal Chrome OS does support both. A lot of users after installing the Chrome OS Flex misses the Android support and therefore want to switch. Let us see how to move from Chrome OS Flex to Chrome OS.
Chrome OS Flex vs Chrome OS
While both operating systems are based on Chromium OS, there are some notable differences between them. Chrome OS comes with a suite of built-in apps and services, including the Google Play Store for Android apps, while Chrome OS Flex relies on web-based applications and services.
In terms of hardware support, Chrome OS is designed to run on specific devices that are certified by Google i.e. Chromebooks. Chrome OS Flex, on the other hand, is designed to run on a wider range of hardware, including older computers that may not meet the hardware requirements for Chrome OS.
Requirements:
- Chrome OS Flex
- 64 Bit Computer System with 16GB or more space
- Secure Boot Disabled from BIOS
- 16 GB USB or above
- UEFI Boot (MBR may or may not support with MBR patch)
- Intel CPU from Sandy Bridge or later (Intel Core 2 Duo or older is Not Supported)
- Atom, Celeron, and Pentium processors are supported as of Baytrail or later.
- AMD Stoney Ridge or AMD Ryzen
- External GPU and ARM CPUs are not supported
Getting Started
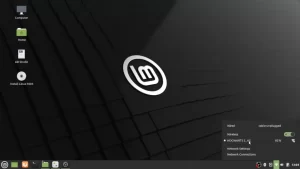
To move from Chrome OS Flex, first, we will download a Linux operating system as we cannot install Chrome OS directly. Here, I have chosen Peppermint OS as it is quite light and minimal. After downloading, rename the file and add .bin at the end. We will also need some more files but we can download them later.
Now, to make a bootable USB we will use the Chromebook Recovery Utility. Open it and then click on the gear icon and select use local media. Choose the Peppermint OS image and your USB, then start the creation process.
How To Move from Chrome OS Flex to Chrome OS
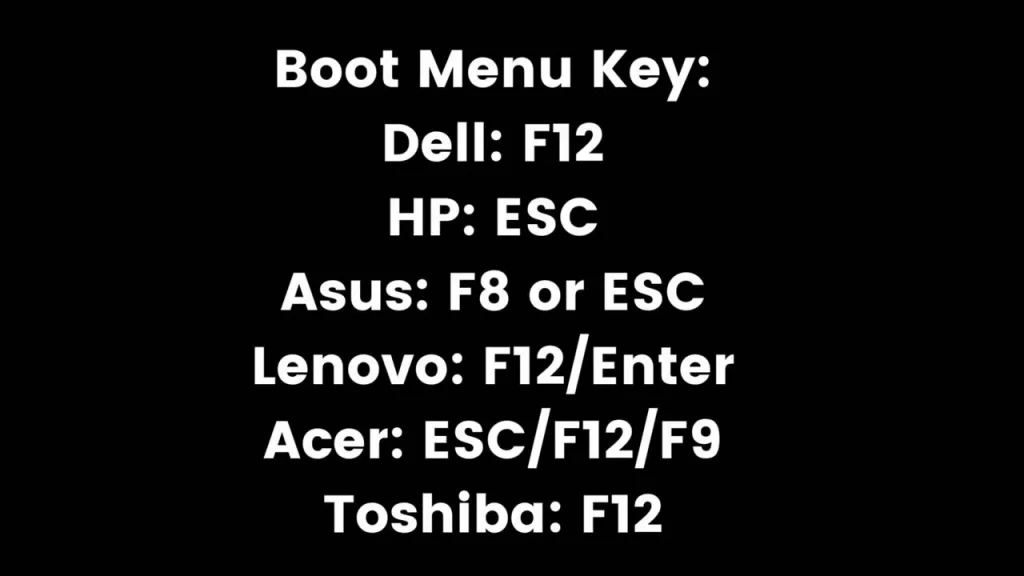
Make sure to back up anything important before proceeding. Power off your system, now press the boot key (see image) and power the button until you see the logo. Now select your USB from the list.
Choose the first option and the live version will load up. Open the installer program and start the setup process. Select Erase disk and then select your primary partition (largest size).
Set the username and password and then restart the system. On the welcome screen select install a web browser and then select Firefox from the list and install it. Then open Firefox from the app list.
Downloads
Now, we will download the Chrome OS Recovery image. There are different versions for different CPUs and generations. Download the latest version from the list.
- Intel 1st Gen to 9th Gen – Rammus
- Intel 10th and 11th gen – Volteer (Some 10th and 11th Gen need Kernel 5.10)
- AMD – Stoney Ridge and Bristol Ridge – Grunt
- AMD Ryzen – Zork (Some Ryzen 4xxx needs Kernel 5.10)
Additionally, we will also need the latest Sebanc Brunch file to make all this work. Thanks to the developer Sebanc for making this possible. Now move all the downloaded files into a folder and name it “ChromeOS“. You can name it anything else but make sure there are no spaces or special characters.
Using Terminal
In the same folder, right-click and then open the terminal. Run the below commands.
sudo apt update && sudo apt -y install pv cgpt tar unzipWe will extract the Brunch file using tar. Replace the filename with the downloaded file’s name.
tar zxvf brunch_filename.tar.gzSimilarly, we will extract the ChromeOS recovery image using unzip. Replace the filename with the downloaded file’s name.
unzip chromeos_filename.bin.zipFor MBR / Legacy devices
After the above process, you need to download the MBR Patch file and extract it. After extraction, it will overwrite some existing files.
tar zxvf mbr_support.tar.gzInstalling Brunch File
Now we can proceed to install the ChromeOS recovery image file using Brunch. Remember to type “Yes” if to any prompt and also you may see some GPT header errors. Which you can safely ignore.
sudo bash chromeos-install.sh -src chromeos_filename.bin -dst chromeos.imgThe process can take a lot of time depending on your storage speed. It will at the end show the message that the installation of ChromeOS was finished.
At this point, we need to make a bootable USB using a program like Balena Etcher. To open Balena Etcher, right-click and under properties > permission, select execute as a program. Then it should open up fine. Open the program and select the “chromeos.img” from your chromeos folder and write it to the USB.
Chrome OS Flex To Chrome OS
Now like before go to the boot menu of your system and choose your USB. You will see the brunch menu of Chrome OS. Then it will start setting up brunch files and this process can take a long time. But after a while, you will see the Chrome OS logo.
Now this is not the installation screen, it is still running from the USB. But we still need to complete the setup. After setting up, open the Chrome browser.
We need to open a Crosh Shell terminal with Ctrl + Alt + T key. Now type shell and hit enter. We now need to find out the disk name, in which we will be installing the Chrome OS using the following command.
lsblk -e7This command will present you with all the storage and partitions on your system. We need to determine which disk is our target disk for installation. Like before it will be of the largest size like sda 931 Gb, etc.
Remember that our target will never be a zram or loop device. Also on some PCs, RAID has to be disabled to list disks correctly. We cannot install Brunch on the device we are booting from, for example, the USB.
Move to Chrome OS with Google Play Store
Once we have located our target disk, we can proceed to install Chrome OS with the below command. Replace the “disk” with your partition. Type “Yes” to any prompt you see during the installation. Remember you may see some GPT Header errors, which we can safely ignore.
sudo chromeos-install -dst /dev/diskThe installation can take time depending on the disk speed. After it is done, you will see a message saying that Chrome OS was installed. Now we can reboot our system and it should boot into Chrome OS.
The first boot can take a very long time. almost an hour. If it does not boot even after that then you refer to this page for possible troubleshooting.
After booting up, you need to complete the setup once again. But this time this is on our system and as our primary operating system. To update the Chrome OS and Brunch, read here.
Check the detailed video guide for this blog post below.
Why Move from Chrome OS Flex to Chrome OS?
One of the standout features of Chrome OS is its integration with the Google Play Store and support for Android apps. We can access the Google Play Store can download and install Android apps just like we would on a smartphone or tablet.
With access to the Google Play Store, we get a wide variety of apps at our disposal. We can choose from popular apps like Netflix, Spotify, and Instagram, as well as productivity apps like Microsoft Office, Adobe Acrobat, and Evernote. This opens up new possibilities for the users, allowing them to use their devices for more than just web browsing and basic productivity tasks.
Apart from just the Android apps, we have support for the vast library of Android games. Popular titles like Call of Duty Mobile, PUBG, Subway Surfers, Asphalt 9, and many more. The best way to experience these games would be either with a touch screen or wireless controllers.
Chrome OS also supports running Android apps in windowed mode, which allows one to have multiple apps open and visible on the screen at the same time. This feature can greatly improve productivity and multitasking.
In addition to the Google Play Store, Chrome OS also supports running Linux apps. This means that users can run a wide range of applications that are not available on the Google Play Store, such as coding tools, design software, and other niche applications.
Overall, the support for Android apps and the Google Play Store greatly expands the capabilities of Chrome OS. Making it a more versatile operating system than Chrome OS Flex.

Hi!
Nice tutorial. I cannot access Google Play, and for me the configuration takes nearly forever. Then it exits with error 5 (“cannot connect to Google Play”).
Any suggestions?
Hello,
thanks, but with Brunch_R117 the installation with “sudo chromeos-install …” is no longer possible, I had to enter the terminal with the key combination “CTRL + ALT + F2” and was able to log in there with root and without a password, then I could So start the command “chromeos-install -dst /dev/Harddisk” without sudo.
greeting
Sven
Thanks bro you save me a lot of time i was struggling for atleast 4 hours