Last year Microsoft announced Windows 11. With that, they also announced support for Android apps on Windows 11. Currently, Windows Subsystem for Android is limited to certain regions. Let us see how we can download and install Android on Windows 11 with the Windows Subsystem for Android. This method will work for all regions.
Requirements
| RAM | 8 GB (minimum) 16 GB (recommended) |
| Storage type | Solid State Drive or SSD (recommended) |
| Processor | Intel Core i3 8th Gen or above AMD Ryzen 3000 or above Qualcomm Snapdragon 8c or above |
| Processor architecture | x64 or ARM64 |
| Virtual Machine Platform | Enable Virtualization and Hyper-V |
Enable Virtualization and Hyper-V on Windows
We need to enable the virtualization from our system BIOS. Remember, if your laptop or system came pre-installed with Windows 11, then virtualization will be enabled by default. While restarting your system, press the BIOS key.
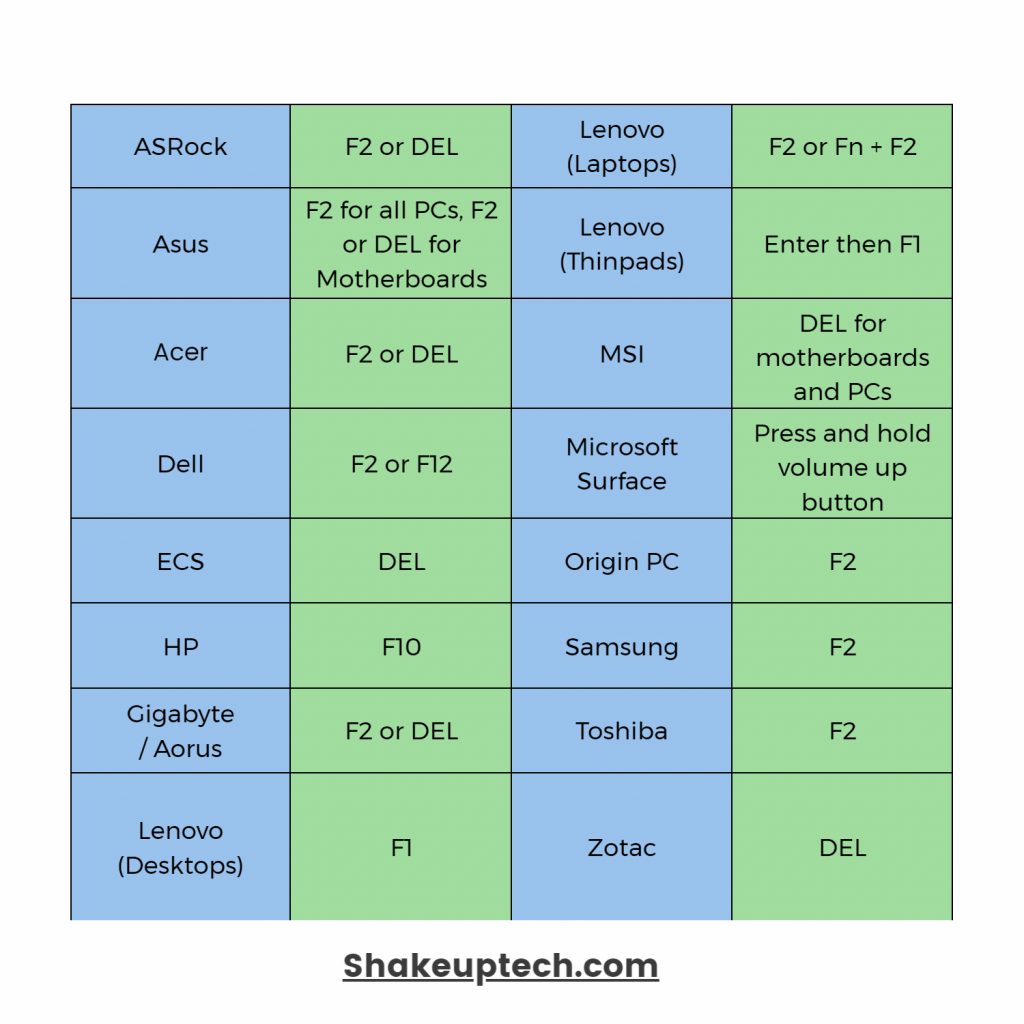
The name for virtualization may be different for different manufacturers. You can check this page to find out what it is called for your PC manufacturer.
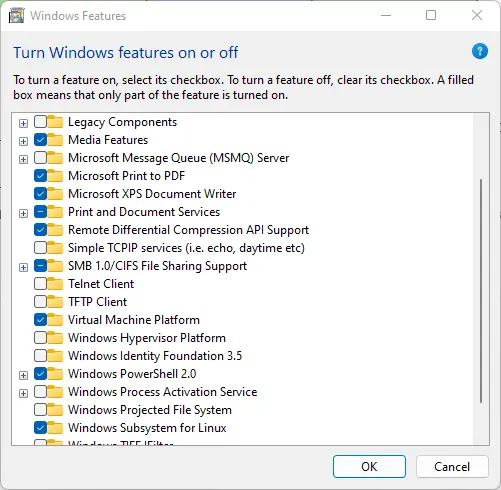
After that, we need to open search and type “Turn Windows features on or off”. Open the control panel page that pops up. You need to checkmark the Hyper-V and Virtual Machine Platform options. For me, there was only the latter option available.
Change Region and Enable Developer Mode
We need to change our system’s region to somewhere Windows Subsystem for Android is available officially. Go to the Settings > Time and Language > Language and Region and change the country to the United States.
Now go to Privacy and Features > For Developers and enable the Developer Mode. You must complete the above two steps in order to install and run Android apps on Windows 11.
Downloading Windows Subsystem for Android
We can download the official Windows Subsystem for Android from the Microsoft store. But it is only available in the counties where it is released. I am from India and currently, it has not been released here. So follow the below steps to download it at your location.
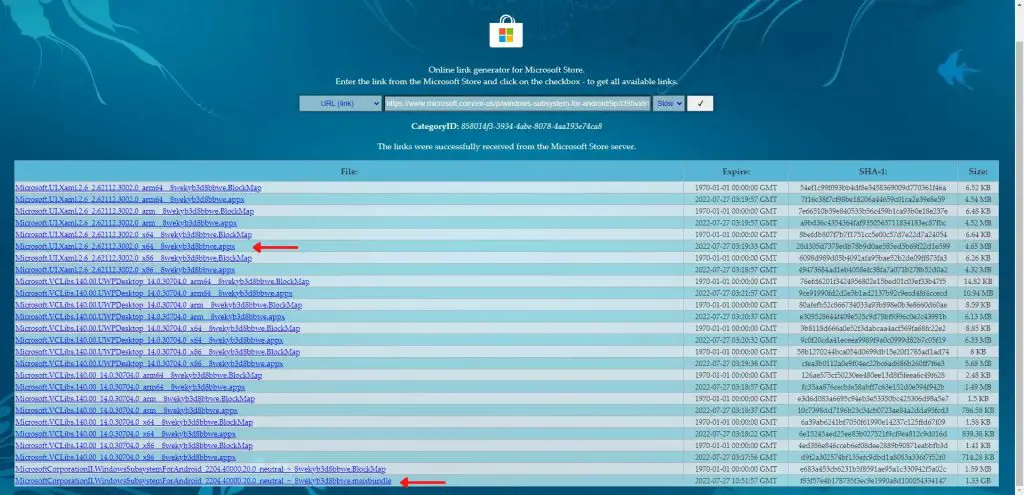
First, copy the Microsoft Store link from above and then visit this link. Now paste the copied link in the search box. On the right side of the box select slow from the drop-down list. Now enter and you will see a bunch of files listed. We need to download Microsoft.UI.Xaml.xxxx_x64__xxxx.appx, make sure to download for x64 system.
Additionally, we also need to download the “MicrosoftCorporationII.WindowsSubsystemForAndroid_xxx_neutral_~_xxxx.msixbundle“, which will be at the bottom of the list. Check the below image for a better understanding.
Installing Android on Windows
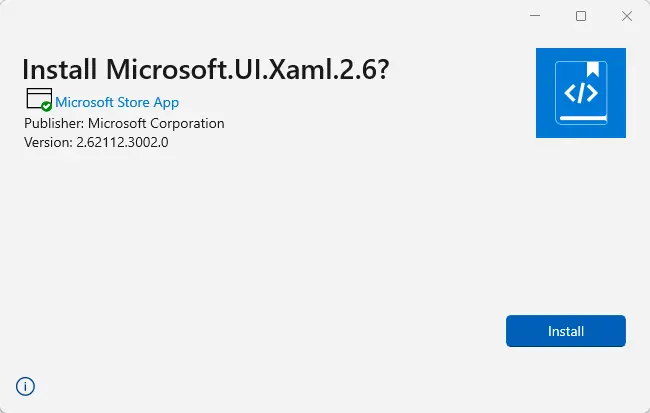
Now we can go ahead and install both the files we just downloaded. Double click on the Microsoft UI Xaml file and you should see a window where it says install.
When trying to install Windows Subsystem for Android you may get a restrictions error. To fix this we need to install it using the terminal. First, right-click on the file and select copy as path. Then, right-click on the start menu and open the terminal as admin. Now type the below command and press enter to install.
Add-AppxPackage "file-location"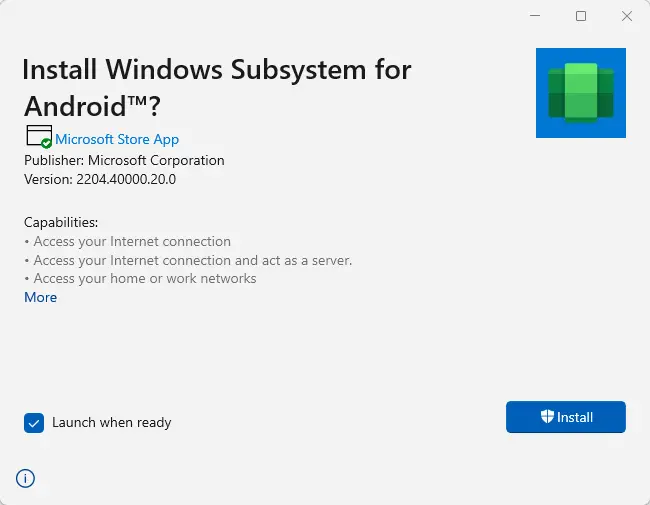
Now after a while the Windows Subsystem for Android will launch itself. Alternatively, you can search for it in the app list and launch it manually.
Installing Android Apps on Windows
Now to install Android apps on Windows we need to install them using ADB commands. First, download the latest ADB installer zip from here. Extract the file and install the program. If you get any error while installing, then create a folder named ‘Desktop” in the C drive > your username.
Now right-click on the start menu and open the terminal as admin. Now type adb devices and the daemon should start and run. You can visit apkmirror or other Android app websites and download the desired .APK file.
After downloading the app, right-click on it and select copy as path. Now in the terminal type and enter.
adb install <path to the file>After this, you will see the app shortcut in the app list and you can launch it from there. Similarly, you can download and install different android apps on your computer. But we cannot run Google apps or apps that require Google Play Services.
Google Play Store Alternative
Instead of downloading .APK files and manually installing them every time. We can make use of a single app that will do the work for us. Like Google Play Store houses all the different Android apps, ready to be installed.
The app is called Aurora store, it is very similar to Google Play Store. It has a number of different Android applications. We just need to install this once and then using it we can install other apps. Aurora store also provides updates for all the existing apps as well.
Google Play Store on Windows 11
We now can also install the full fledge Google Play Store on our WIndows 11 as well. First visit this link to download the MagiskonWSA (Currently Restricted) file. Go to the Action tab and then select Build WSA. you should see two files listed there. One for x64 and other for arm64 system.
If you don’t see the files then you need to go to the code tab and follow the video guide to build the WSA file manually. The process is not that difficult and also we need to sign-in to download any files. So assuming you can see the two files, download the one according your system.
The download page for MagiskonWSA has been restricted, most probably by Microsoft. The official GitHub page is restricted and cannot be access as of now. I have uploaded the last latest version on Google drive. You can download it from here. Make sure you do not share the link with anyone else, as it may get restricted as well.
Now before proceeding, go to your Windows security and dfisdable any virus scan feature. This is to prevent it from deleting any files from our folder. Now we can right-click on our downloaded file and extract it.
Installing MagiskonWSA
Now in the extracted folder, locate a file named install.ps1. We need to righ-click on it and then select run with PowerShell. It will open the command prompt and now you need to type A and press enter to start the installation. This will allow all the processes without asking for permission everytime.
After the process is completed you will see the Windows subsystem for Android program loading up. In my case the program was stuck so I had to close it and open from the app list. Even then I noticed there was no Google Play Store or Magisk installed.
To fix this issue, all we need to do is to re-run hte install.ps1 file again. Follow all the previous steps again and this time ytou will see the Google Play Store and Magisk loading up. We can then add our Google account and access millions of Android apps and games.
Conclusion
So I tried installing Youtube and other Android apps, and the experience was good. I was able to watch videos and edit photos using these apps. i also tried playing Subway Surfers, the performance was laggy on my low-end system. We only can use our mouse to simulate the touch gesturte for these games.
Performance with more capable CPU and GPU will be much better. I tried with a Ryzen 5600H laptop and the gameplay was quite smooth. So overall quite a great experience with Google Play Store on the Windows 11.