Chrome OS is a popular operating system made by Google. It is cloud-based and lightweight. It is popular for its Android app support. In this post, let’s see how to download and install Chrome OS with Google Play Store Support.
What is Google Chrome OS?
Chrome OS was first announced back in 2009 as a platform where applications and user data are in the cloud. That is why Chrome OS mostly runs web applications that are quite lightweight in size. It is derived from Chromium OS, which is an open-source operating system.
It uses the Chrome browser for most of its user interface. But Chrome OS unlike Chromium OS is a proprietary operating system. This means it’s not open source and cannot be installed on any device.

Things To Know Before Installing Chrome OS
People with Windows OS are often curious as to why Chrome OS is becoming so popular. Developers like Sebanc allowed the Windows community to try it out for themselves. We have a couple of methods to do so but some are quite complicated.
Chrome OS is exclusive to Chromebooks, Chromebox, and Chromebase. There is still no official way to install it on your laptop or PC. We have Neverware Cloudready, But it does not officially support Android apps or the Google Play Store, which makes it somewhat unpopular among tech enthusiasts.
There is however an unofficial way to download and install the latest Chrome OS on our laptops and PC. We need to download a couple of files and perform some steps. We will discuss all of that in this article.
Installing Chrome OS
In this post, we will learn how to install Chrome OS on your Windows computer without the use of Linux OS. This will install Chrome as the primary OS and replace the Windows OS completely. Make sure you proceed after taking a backup of all your important data.
Prerequisites to Installing Chrome OS:
- 64 Bit Computer System with 16GB or more space
- Secure Boot Disabled from BIOS
- Hyper-V or Virtualization is enabled from BIOS
- 16 GB USB or above
- UEFI Boot
- Intel CPU from Skylake or above (6th Gen or above)
- Celeron processors are supported as of Goldmont or later.
- AMD Ryzen
- ARM CPUs are not supported
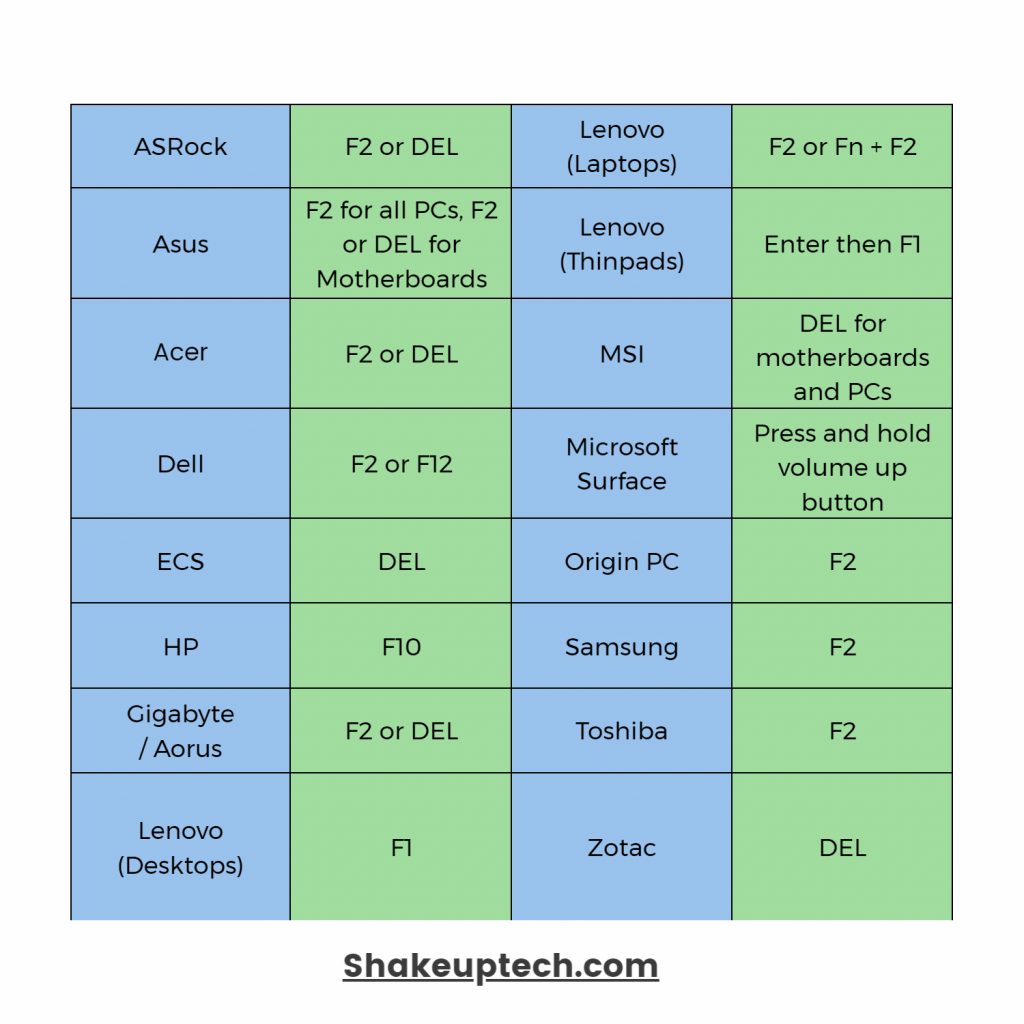
Disable Secure Boot
We need to disable secure boot from the BIOS of our computer. Different manufacturers have different keys to enter the BIOS. You can find the BIOS keys for various companies below. While you are here and if your system is a bit older. Also, find something called the “legacy boot” and disable that as well.
And lastly, we need to enable options related to virtualization. It is called Hyper-V for some just virtualization for others. On modern computers, it is enabled by default. So, if you don’t see such an option, then it must be enabled already.
Downloads For Installing Chrome OS
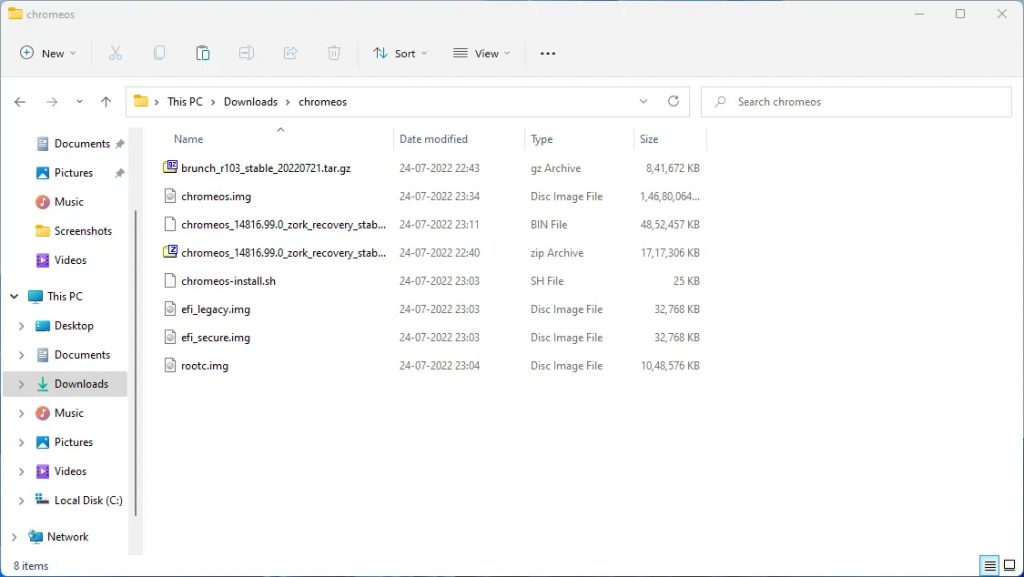
We can download the Chrome OS (Recovery image) from the website cros tech website. There are different versions for different CPUs and generations. Download the latest Chrome OS version from the list. Also, we need the latest Sebanc Brunch file to make all this work. Thanks to the developer Sebanc for making this possible. Now move all the downloaded files into a folder and name it “chromeos“. You can name it anything else but make sure there are no spaces or special characters.
- Intel 1st Gen to 9th Gen – Rammus and choose Shyvana
- Intel 10th gen – hatch and choose Jinlon
- Intel 11th gen – Volteer and choose Voxel
- AMD Ryzen – Zork and choose Gumboz
Lastly, we need a program to create bootable USB for Chrome OS like Rufus or Balena Etcher.
Installing WSL
Before proceeding, make sure your Hyper-V or Virtualization is enabled from the BIOS menu of your system. We need to install the Ubuntu terminal on our system. Right-click on the start menu and open PowerShell as admin. Now type:
wsl --installRemember that WSL needs a Windows 10 or 11 version, higher than the 1903 update. Make sure to update your Windows 10 or 11 before proceeding.
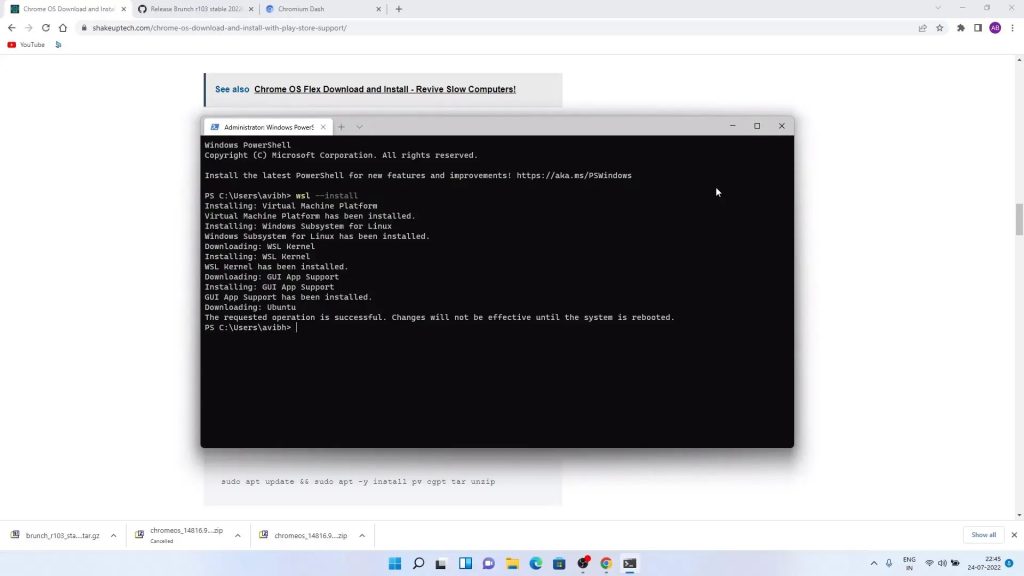
This will install the virtual machine platform, windows subsystem for Linux, Ubuntu, and other additional files. Now you need to reboot your system. After that, there will be the Ubuntu terminal program installed on your computer. You can see the icon in the app list or you can search for it. Now in the Ubuntu terminal, we will run some commands:
sudo apt update && sudo apt -y install pv cgpt tar unzip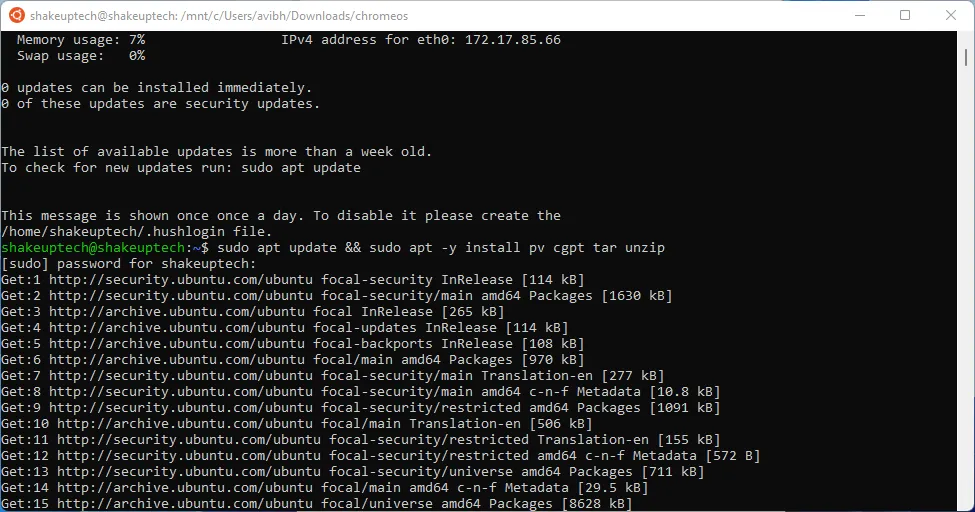
This will update the binaries and also install the required tools for the next process. Now if you are having some issues downloading the above tools. Then you can run the below command first.
sudo add-apt-repository universeNow we have to mount the directory where the downloaded files are located.
cd /mnt/c/Users/username/Downloads/chromeosWe will extract the Brunch file using tar.
tar zxvf brunch_filename.tar.gzSimilarly, we will extract the ChromeOS recovery image using unzip.
unzip chromeos_filename.bin.zipFor MBR / Legacy devices
After the above process, you need to download the MBR Patch file and extract it. After extraction, it will overwrite some existing files.
tar zxvf mbr_support.tar.gz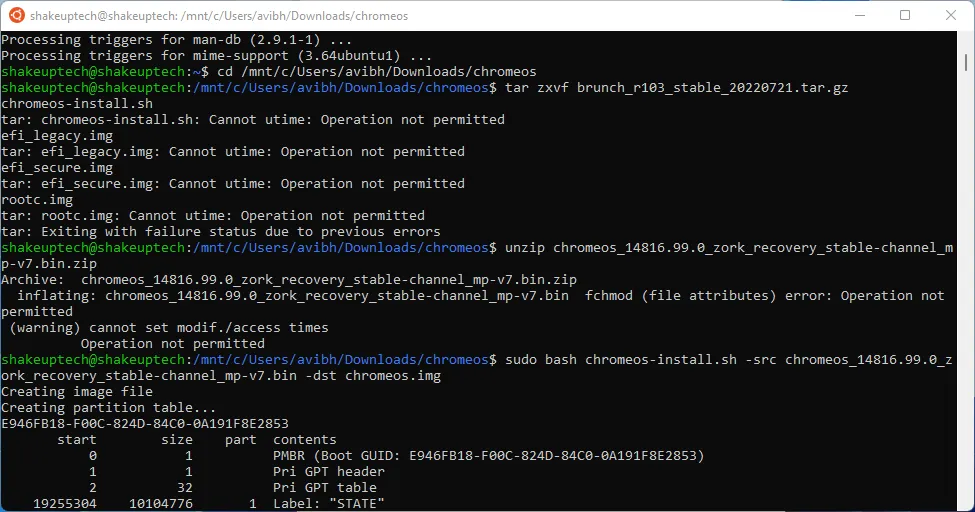
Installing Chrome OS with Brunch
Now we can proceed to install the ChromeOS recovery image file using Brunch. Remember to type “Yes” if to any prompt and also you may see some GPT header errors. Which you can safely ignore.
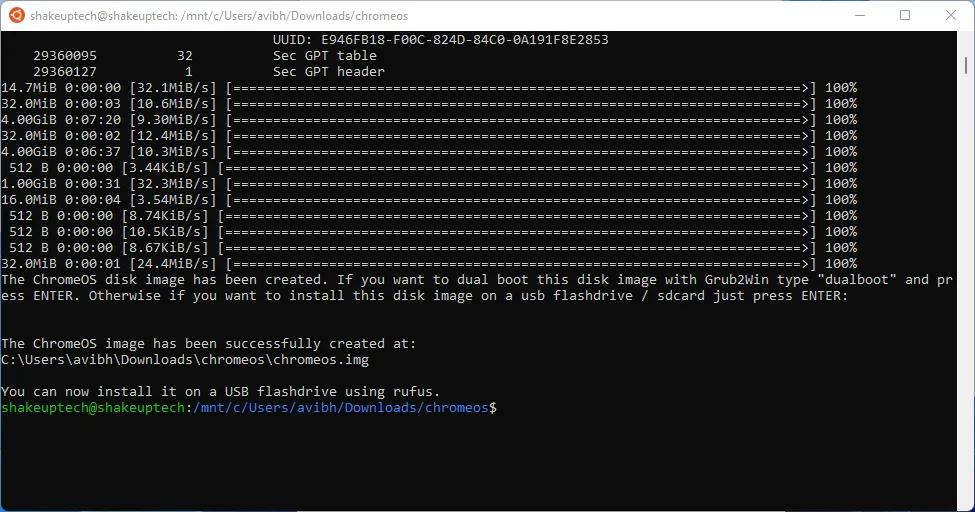
sudo bash chromeos-install.sh -src chromeos_filename.bin -dst chromeos.imgThe process can take a lot of time depending on your storage speed. It will at the end show the message that the installation of ChromeOS was finished.
Installing Chrome OS on a USB
At this point, we need to make a bootable USB using programs like Rufus or Balena Etcher. Open the program select the “chromeos.img” from your chromeos folder and write it to the USB.
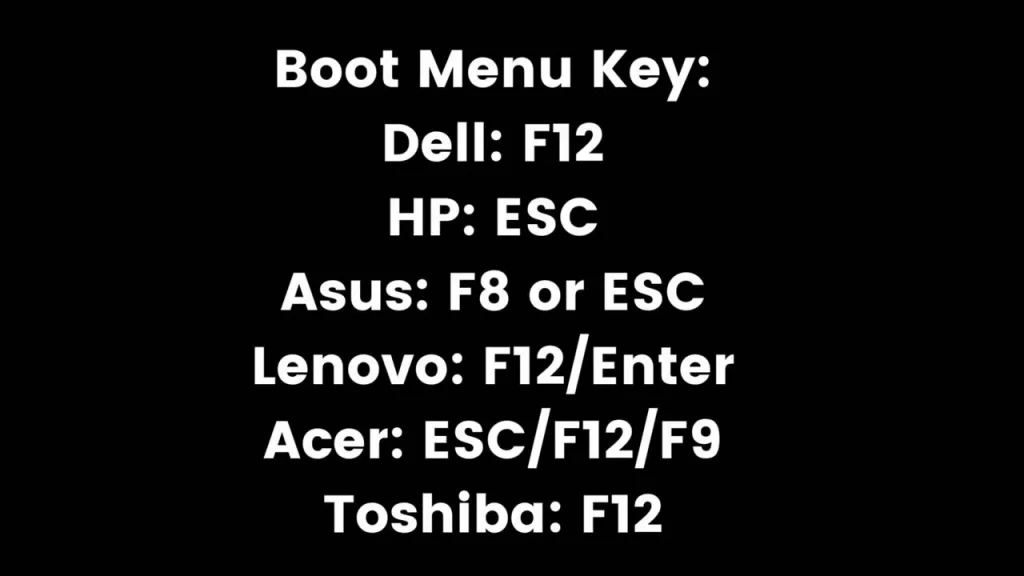
If you want to run the Chrome OS using the USB, then keep the USB plugged in and boot. While restarting press the boot key and select your USB. The first boot will take a long time. If for some reason it does not boot up even after an hour. then you can refer to this page for possible troubleshooting.
The storage may show the installation size as only 14 GB, even if it is more than that. We can fix this by opening a shell window with Ctrl+Alt+F2. Type root and then resize-data and enter. Now you can restart your system again and the issue should be resolved.
Installing Chrome OS on Windows
Now if we want to install the Chrome OS on the entire storage of the system, we can do that as well using the Chrome OS Brunch USB we created above. this will wipe everything on the system and replace your current Windows Operating System.
Boot into the Chrome OS using the USB open a Crosh Shell terminal with Ctrl + Alt + T and enter shell at the prompt. Now we need to find out the disk name, in which we will be installing the Chrome OS using the following command.
lsblk -e7This command will present you with all the storage and partitions on your system. We need to determine which disk is our target disk for installation.
Remember that our target will never be a zram or loop device. Also on some PCs, RAID has to be disabled to list disks correctly. We cannot install Brunch on the device we are booting from, for example, the USB.
Once we have located our target disk, we can proceed to install Chrome OS with the below command. Type “Yes” to any prompt you see during the installation. Remember you may see some GPT Header errors, which we can safely ignore.
sudo chromeos-install -dst /dev/diskThe installation can take time depending on the disk speed. After it is done, you will see a message saying that Chrome OS was installed. Now we can reboot our system and it should boot into Chrome OS.
The first boot can take a very long time. almost an hour. If it does not boot even after that then you refer to this page for possible troubleshooting.
Also, READ Dual Boot Chrome OS and Windows – Install Without Linux or USB!
Reasons To Install Chrome OS
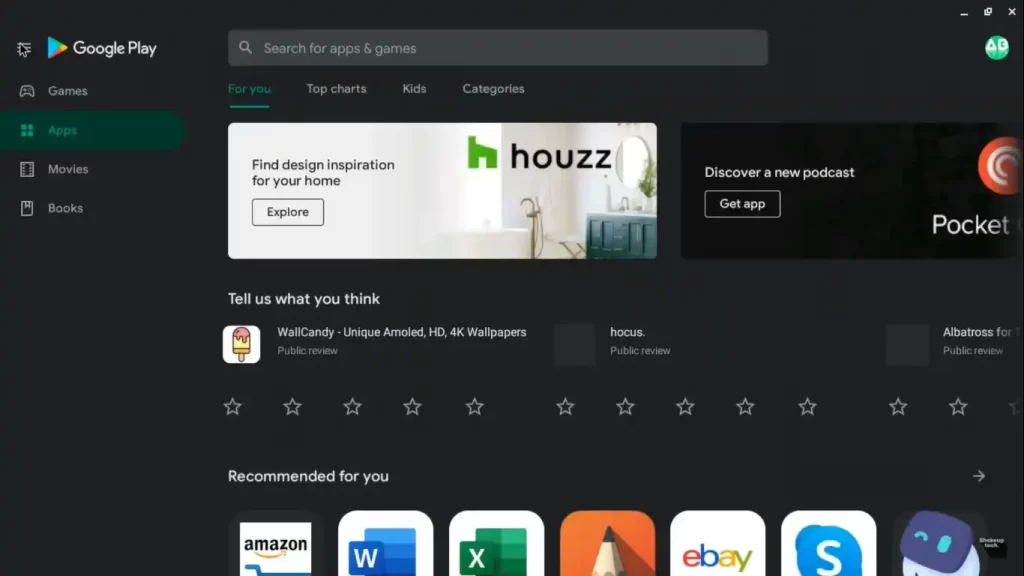
Android and Google Play Store Support
Chrome OS started supporting Android apps in 2014. Later in 2016, all the Chromebooks launched supported Google Play Sore. This made the Chromebook even more popular as the Play Store is the number one platform for millions of Android applications. Now users are able to download and use a variety of apps other than Chrome web apps.
With the launch of touchscreen Chromebooks, many popular Android games like PUBG and COD Mobile were now easily playable. We can now do video editing, photo editing, and other creative work with our favourite Android apps.
Smart Updates
Chrome OS has a very unique feature of updating the OS in the background. Usually, when updating an OS, for example, Windows, it takes several minutes to download and install the updates. After that, we need to restart the computer to apply the update which sometimes takes hours. So our PC is unusable during that phase.
Chrome OS on the other hand has two instances of OS running in the background. So while one OS is updating and installing we can still keep using the other OS. It makes the troublesome process of updates very convenient. We only need to restart the device once it’s done.
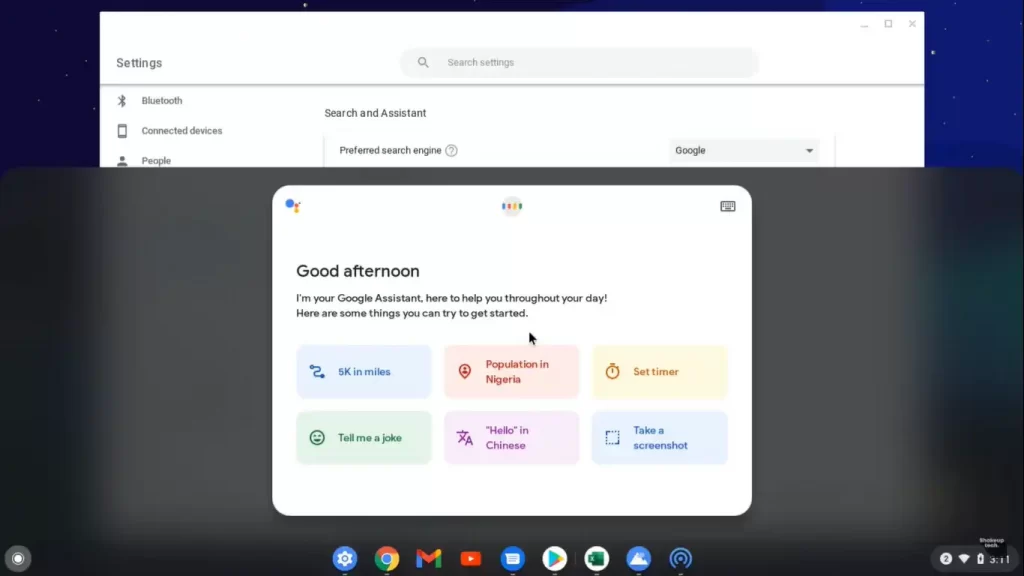
Google Assistant
Another reason to Download Chrome OS is Google Assistant. Google Assistant is one of the smartest virtual assistants out there. Many use it on their smartphones or smart home devices every day. Cortana on Windows is not very intuitive and rarely anyone uses it nowadays. I always wanted to use Google Assistant on my laptop but there is no official app or method to activate it.
We can perform all the actions that we do with Google Assistant on our smartphones here as well. Turning on or off the smart lights and appliances, setting the alarms and reminders, and much more.

thus this chromeos supports ota updates
No, but we can manually update it. I will add the steps soon.
What’s the steps to get updates also my play store will load then next time it won’t just twirls
Dude, good explanation. I already did the installation of Chrome Os Flex. How can I install the Play Store from this operating system?
Amigo, hasta donde se Chrome OS Flex no admitirá Android
Thank you so much. This is the resource iv been looking for!!! I got CromeOS running on my IMac and Asus laptop (touch screen works) thank you so much!!!!
Glad it was helpful.