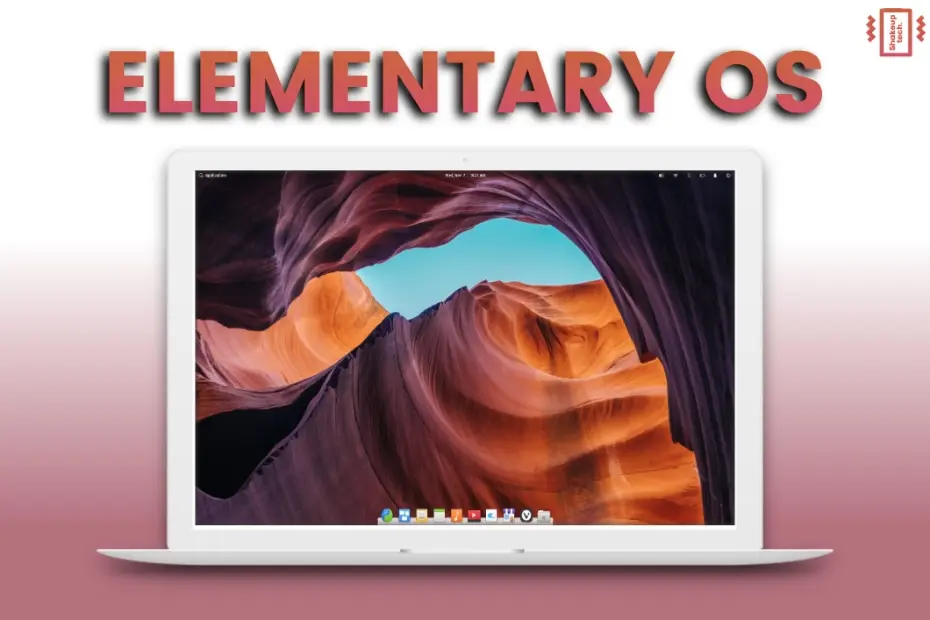
In the world of Linux, change is constant. That is the case with the New Elementary OS 7 Horus. We get to see new visuals and updated style. Let us explore the operating system and also understand how to dual boot Elementary OS with WIndows.
How to Dual Boot Elementary OS and Windows?
Requirements
There are no minimum system requirements. But the recommended ones are as follows:
- Recent Intel i3 or comparable dual-core 64-bit processor
- 4 GB of system memory (RAM)
In addition to that, also follow the below steps:
- Secure boot disabled
- 4GB or above USB or Pen drive
- 20GB or above space available
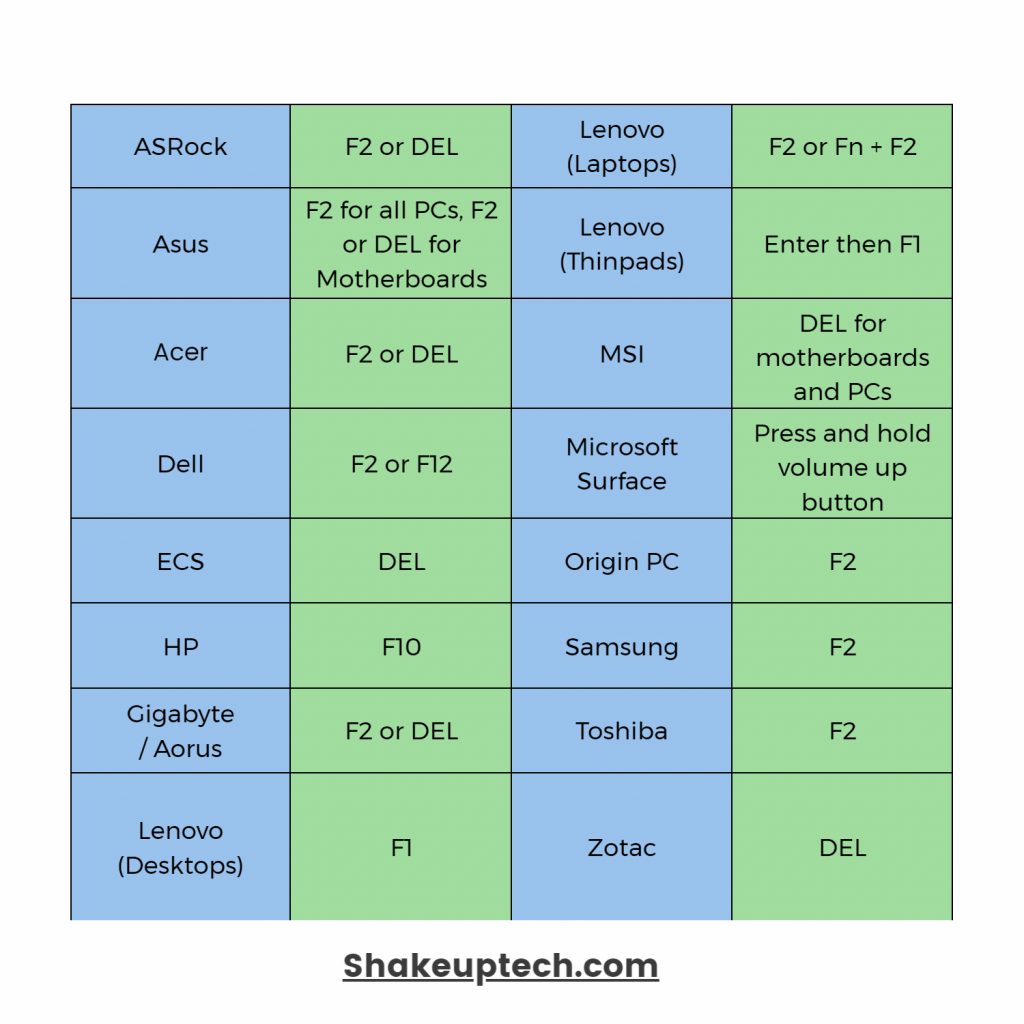
To disable secure boot, go to the BIOS of your system. Power off the device and then press Power button + BIOS Key (see image below).
In the BIOS menu, search for the secure boot settings. Usually under the security or boot options. Then make sure to disable the option.
Getting Started
Before installing Elementary OS in dual boot with Windows, we need to create a partition for it. On your Windows desktop, right click the start menu and choose “Disk Management”.
Here we will use either the C Drive or the D Drive to create a new partition. So, right click on the desired drive and select shrink. Then put in the value above 20GB or 20000. After completion, you will see the new unallocated space.
Right-click on the unallocated space and select “create new volume”. Now, continue with the steps shown and you will have the new partition for the Elementary OS ready to go.
Downloads
To start with, we will first download the Elementary OS 7 ISO image from this link. It will ask you to type in an amount to purchase, which you can do so to support the development. Or to download it for free just type “0” and then download the ISO file.
Furthermore, to create the bootable image and dual boot Elementary OS, we will also need an additional program. So, visit this link and download “Balena Etcher”. You can download the portable version, which does not require installation.
Flashing Elementary OS 7 ISO
Next, we will open the Balena Etcher program. Here we need to first select the image file, that is the elementary OS 7 ISO image. After that, select the target USB drive and then start the flashing process.
Installing Elementary OS in Dual Boot
After the flashing is done, we need to shut down our system. Then press the power button and the boot key (see the image below). Here select your USB from the list, if you see two USB then choose the first one.
Now you will see the installation screen, so select your language and keyboard layout. Now in the next screen we need to choose “custom install” to dual boot elementary OS.
The installation is a little complicated here compared to others Linux distros. As we need to select two partitions to begin the installation. We have to mount one partition as “boot/efi” and the other as “Root”.
Root and Boot Partition
The partition that we made earlier can be mounted as the /root partition. Select it and enable “use the partition” and select use as “Root (/)“. But we don’t have a partition to mount as boot.
For that, select the Modify partitions option on the bottom left side. Here right-click on your C or D drive and choose resize move. Then type 500 in the Free space remaining following. If you don’t see the resize option as clickable, then select align to option and just choose the default one.
Now you can see a new 500 MB unallocated space, right-click on that and choose the create “New” option. Leave the settings as default and select “add“. Now click on the green arrow on the top left side and the process to format and create new partition will begin.
Dual Boot Elementary OS and Windows
Now click on the cross icon and the partitions will refresh and now you can see the new 500 MB on the drive list. Click on that and select use as “boot/efi” option. after that you can see the erase and install button as a red clickable icon.
The installation will take a long time and then it will ask to restart and then remove your USB and restart again. After that you can see the dual boot menu, where you can choose between Elementary OS and Windows.
Now set up your username, password and connect to the internet to start using the amazing Elementary OS.